
SU Carburetters
(British spelling in honor of their country of origin!) - R. Kwas 2004-2026, revisions On-Going.
[Comments added !]
The information presented is from my experience, it is not intended to take the place of an SU manual, or even just the Carburetter (British spelling), section of the shop manuals out there, but should be used in conjunction with their content. I have tried to use terms like Dashpot, Dome and Bowl Valve (opposed to Needle valve) to refer to specific components, so reader may notice some inconsistency with factory terminology...
SU Carb Service - Lite and
Expanded versions.
includes:
Check and Adjustment of Fuelbowl Floats
SU Carb History
SU Books available
Comparing Metering Needle Dimensions
"Tuning"
and "Synchronizing" SUs
Tuning
Tool Set
Mixture
adjustment
Initial Mixture Setting After Jet
replacement
Using
the Lifting Pin to Check Idle Mixture
Damping of Dashpot
Damping Oil
The "5-7 Second Test"
Damping Valve Function
Thumbscrew of Dashpot Damping Valve keeps loosening
Damping Valve Assembly
SU Carb Applications
Metering Needles
Thumbscrew of
Dashpot Damping Valve keeps loosening
Damper Thumbscrew Fiber Washer
Common
SU problems:
Overflowing
Fuel Bowls
False Air
SU Upgrades:
Brickboard Reprints on SUs:
Hot starting an
SU equipped vintage Volvo or Starting after a Heat-Soak:
Long Cranking during Starting Attempts after
Extended Parking Times
Start Procedure after
Extended Parking Time
Reference Information
Metering
Needles used on various engine configurations
Comparing SU Carbs: HS vs. HIF,
"Two-Bolt" vs. "Three-Bolt"
Links
Tom Bryant
Links
to Videos
John Twist - SU Part 1.
John Twist - SU Part 2.
Delaware_Valley_Triumphs_SU_presentation_Part_1
Delaware_Valley_Triumphs_SU_presentation_Part_2
Incorrect Metering Needles
Grose Jet Product Sheet
Fuel Bowl Venting
ECB18
Webers?!?
SW-EM Links to related Tech Info not on this page:
Carburetor
Additional Notes
Mixture Optimization and the Gunson Colortune
Wideband O2
Sensors
Carb
Spacer/Thermal Isolator Notes and Observations
Fuel Delivery
Components and Considerations
Separate article on Choke
SU Jet Bearing
and Supply Tube Notes
SU HS6 Jet Supply Line Seal
SU Carb Throttle Plate Early
vs. Late including
Throttle Overrun Valve
SU Carb. Adding
Threaded Inserts for Air Cleaner Securing
SU Carb
Lifting Pin for Mixture Checking
---------------------------------------------------------------------------------
Probably
because they are not electrical in any way (and therefore exempt from the
Lucas curse), the SU carbs of a vintage Volvo are,
in my opinion, one of the few things the British car industry got really right,
bless them...(contrary to what you might hear in the automotive world from guys
who only know downdraft Holley carbs...)!

History. SU carbs were allegedly developed working with plumbers (air and fuel "flow" through them, so that makes sense, sort of). It is well known that SU stands for Skinner's Union, my careful research has uncovered however, the less well known fact, that they were actually developed by British pork butchers, and that SU was actually shortened from SSU, standing for the Sausage Skinners Union. Below, an earlier development of the Sausage Skinners Union. The SSU, SG5, featuring "Spiral Venturi Design" (SVD). It was said to be the inspiration for the first SU side draft carburetter...ca. 1902...the family resemblance is apparent.

SU SG5 with SVD (and an integral Velocity stack!)
After a lot of "product development", this is what they came up with. It's a beautiful thing!
Setting the SU History Record Straight

Exploded Diagram of a (late) SU HS6 Carb as used on Vintage Volvos. Referenced
Components are Highlighted.
Dome assembly(11), Dashpot (12), Dampening Valve (15), Fiber
Washer (16), Guidetube and Damper Spring (14), Idle Screw (10), Fast Idle
Cam (55) and Fast Idle Screw (49), Throttle Linkage/Plate (43, 44, 46), Jet
assembly (22 - 30), Lifting Pin and Spring (5, 6), Fuelbowl lid (36), Lidscrew
and Washer (38, 39), Bowlvalve Assembly (40), Bowl Float and Float Pin (41,
42). Links shown in this list point to stand-alone Notes or Tech Articles.
SU HS6 Exploded Diagram for
reference.
Later version, with Secondary Throttle Linkage (48),
floating Metering Needle
(17,18,19), as well as
Throttle Overrun Valve
and
Fuel Bowl Cap (36) with Bowl-valve (40) and provision for Vent tubing is shown.
Source: Green Factory Manual, author's markups.
In a wonderfully simple SU carburetter, the varying exposure of a tapered "Metering Needle" (19) as Dashpot (12) vertical position varies as a function of air induction, is the mechanical equivalent of the electronic engine management system's lookup table or "engine map". Naturally, in the modern electronic engine management system, there is a lot more optimization going on, but the SU had the really important issue - correct metering and dispensing of fuel for the volume of air drawn through - very well under control.
The SU carburetter is of a constant Velocity, variable choke design...that is, by varying the position of the Dashpot as a function of the volume of air the engine draws, and this is controlled by the driver's control of the Throlle, the cross-sectional area of the throat of the carb is varied, which keeps the velocity at the Venturi constant...and by keeping the velocity constant, it is fairly simple to meter the fuel for a given volume of air induced, although this leads to somewhat of an oversimplification in fuel metering, since the fuel should be metered as a function of mass of the air being ingested and not just volume (as density of the air, which can vary due to things like weather, season and altitude, is not compensated for). That is why I like to adjust the mixture for summer and winter, or one would have to make adjustments to compensate for large changes in altitude. Other than that, I find they seem to thrive on neglect, I honestly don't understand why some owners seem to continuously need to fiddle with them!
An exception to the constant velocity does occur during changes in the throttle position...like Acceleration...more on this under Damping Oil following.
"Tuning S.U. Carburettors, published by Speedsport Motorbooks 1975, ISBN85113-072-0" Link to Library.
----------------
Haynes manual. (not nearly as detailed, but perfectly adequate for normal maintenance)
----------------

----------------
SU Carb Applications Here's a handy chart relating an engine cc's and HP range with the size and number of SU carbs recommended...in the case of a 2 liter Volvo engine with two 1 3/4" HS6s, it would seem that we have plenty of carburetion from the factory!

Source:
Tuning S.U. Carburetters Published by Speedsport Motorbooks
Dimensions of Metering Needles used in SU Carbs fitted to some vintage Volvos:

Metering Needle dimensions. measured in 0.100
[Correction: 1/8"!] increments starting
from the shoulder. Note that when used with a 0.100" Jet, and with Dashpot
in the lowest position, that would be a mere 0.001 of clearance...not very much
at all!... and making the point of how important clearance and centering of the
jet is.
Link to Reference Information: Workshop Bulletin, Metering Needles (showing a more complete listing)
Comparing Metering Needle Dimensions:
I have recently run across this tool which allows selecting any MN and it draws a graph which shows the dimensions and draws a cute little chart allowing an instant comparison. I have entered the two common stock MNs of KD and ZH to generate the following graph where it is immediately clear that the KD needle is richer throughout the entire range. [Note: Authors of the chart use metric dimensions.]
https://www.classicminidiy.com/technical/needles/#

"Tuning" and "Synchronizing" SUs:
Centering the jets: The metering needle (19) and jet (22) may not come into contact. If they did, wear would surely result to these precision parts, which should stay precise! Link to Service Notes Page on centering carb jets.
"Synchronizing" the carbs. This impressive sounding term, which sounds as though it was borrowed from NASA, is the source of much confusion, profit to purveyors of unusual looking "special" tools, and more discussion than New England weather. I don't see the big deal...it seems intuitive that the two carbs need to be doing the same thing at the same time...so after assuring that the linkages act upon the Throttles at the same time (and this can be checked with engine off), the carbs should be dynamically "synched" (an even more impressive term, which simply means they also do the same thing when engine is running!), that is, throttle idles adjustment screws (10) should be adjusted such that at idle, the induction of the carbs is as close to equal as possible. This will result in a nice even, smooth idle. A number of devices are available to help with this equalization, and I too own a couple of them...the Unisync and Tuning Tool Set...but I find that these NEVER make it out of the toolbox anymore! I prefer instead to use my own original equipment for tuning...and I have this with me ALL THE TIME! I use my eyes and ears! I look at the height which the dashpot is raised, and I might stick my head down between the two carbs to better listen and compare the wonderful sucking noises.
* (Hypothetical questions: What's the difference between a visual indication by a little indicator button being sucked up the tube of a Unisync, for instance, vs. the dashpot of the carb being sucked up? Why would you trust a separate indicator tool more than the actual carb?)
Link to Volvoniacs thread on Carb Synching: http://www.volvoniacs.org/forum/thread.jsp?forum=31&thread=1764&start=0&msRange=15
Synchronizing Tools
Unisync A little red "float" is sucked up the the graduated indicator tube as a function of the amount of air pulled past its own variable venturi.

Unisync...removed from its resting place in the toolbox for the
first
time in more than a decade for dusting and pictures!
---------------------
Tuning Tool Set with "Pointer wires". Its resting place is right there in the tool box....next to the Unisync!

This picture is left as a large file to retain the detail of
instructions.
The jet centering pin is
seen at lower left.
Synchronizing SUs (much ado about nothing!)
My comments to a thread (https://www.swedespeed.com/threads/tinfoil-gas-cap-67-122s-project-thread.668582/page-4#post-8122313 Post #67 ) about carb synchronization:
" As I noted before, I have used the listening [to the two carbs] technique, but one I find even better, and the one I exclusively use now, is the visual technique of comparing the Dashpot height (gap to Venturi)...and my eyes still work perfectly! This is in-fact the basis on which those cute little tuning kits with the wire pointers work...you remove the Damping Valves, and insert two little wires into top of Dashpot and let them point at each other and compare...I fail to see what the difference is between that and watching the gap to venturi at the bottom of Dashpot...because there is none!! [the Tuning Kit has the slight advantage that the formed indicating wires can be installed by only removing the Dashping Valves...there is no need to even the Air Filters...so the test is minimally invasive, and very much like in service, which is another (and big) advantage to this method!]
Besides, when Damping Valves are removed in order to install those wire pointers, there can be/will be no damping whatsoever!...and damping is one important carb function I like to compare between carbs (when blipping throttle), but under that test condition, is not even able to be checked!!!
Yes, the Air Filters need to be removed for this visual comparison of Dashpot height/idle adjustment, but there is little difference with them installed (given they are in relatively clean/low restriction condition)...and yes, it does say in the instructions to use a "Unisyn" for "precision synchronization", but it also clearly states "it is possible to synchronize without flow meter by comparing the height at which each piston [Dashpot] is lifted at idling and at higher RPM." ...that's enough for me...and my practical experience has shown it works wonderfully! "
Excerpt from the Tuning Kit Set Instructions:

Happy SU Synchronizing...with on-board equipment (eyes and ears)...little more!!
---------------------
Carbalancer I don't have one of these (I'm concerned with the possibility of being arrested for possession of drug paraphernalia), but it looks like it works in the same way as the Unisync, except the indicator is separate from the venturi.

Picture source:
http://www.stevens-wesel.de/werkzeug.htm
---------------------
Maintenance: SU carbs, once set for satisfactory operation, they don't really need a lot of attention...sure the linkages should be clean and (must be!) lubed, and the damping oil should be checked occasionally. I also find that a half turn richer for the cold (and flu) season on the Mixture Adjustment Nut (see below!) also gives better throttle response, but owner/mechanics who insist on needlessly fiddling with their SUs should consider getting a high-maintenance girlfriend, or maybe taking up video games, or knitting, or some other hobbies less harmful to the way their vintage Volvo runs.

Mixture Adjustment Nut at Green (15mm*). Jet Locking Nut at
Red (18mm*,
leave this one alone(!),
unless adjusting and locking jet centering!) * typical sizes, but variations
have been observed!
See also: Mixture Optimization and the Gunson Colortune
Initial Mixture Setting After Jet Replacement, or major service where Jet vertical position may have been moved, should be 2 full turns/12flats on Mixture Adjustment Nut down from Jet Flush at Venturi. That will enable engine to start so a fine mixture tuning can be performed.
 |
 |
| Jet Flush. | Jet "down" 12 flats of Mixture Adjustment Nut. |
Link also to separate SW-EM Tech Articles: SU Jet Bearing and Supply Tube Notes and SU HS6 Jet Supply Line Seal
Using the Lifting Pin to Check Idle Mixture:
SW-EM SU Carb Lifting Pin for Mixture Checking
SW-EM SU Carb Lifting Pin for Mixture Checking
Damping oil. Function of the damping oil is three-fold. First, to lubricate the precision fit and the never-ending movement of the Dashpot (12). Second, to dampen rapid pulsing of the dashpot at low RPMs, and thirdly, to slow dashpot rising response when throttle opening is increased, effectively enriching the air-fuel mixture (an accelerator pump effect).

Picture source: http://www.aptfast.com
It's amazing what "information" is out there on what type of oil to use in this application...all the way from water to SEA90 weight! Experimentation or custom tuning notwithstanding, it should nominally be a straight 20SAE weight oil (Reference 1), and since it is (quite) slowly consumed as droplets are slowly liberated from the valving mechanism by the vacuum, and sucked out the holes in the bottom of damper piston, dashpots reservoirs should be checked and topped up** a couple of times a year (I do it when setting the Summer/Winter mixture). Fluid prices range from $5.75 to $8.95 for 125ml of official SU oil in a container with an official SU label, or $2 for a whole quart of automatic transmission fluid (ATF) or about $10 for a gallon of Marvel Mystery Oil...the choice is the reader's, but I know what I prefer!
** "Topping up" is a misleading term...topping up suggests that the reservoir should be filled a lot more than it should be...the damper tube filled to the top is way too full...about a thimble full should be enough (or a teaspoon, or 2ccs, a quarter of a shot glass etc. ...whatever's handy!)...the important point is to to have the one-way-valve (those brass parts on the bottom end of the rod coming down from the Screw-On cap (15)) totally submerged in it at all times and at all vertical locations of travel as the dashpot moves. And to prevent those telltale "blood-spots" on the underside of the hood from overfilled oil shooting out of the vent, I just snug on the Screw-on cap, hold a rag over the vent-hole, and (air filter removed) lift the dashpot as high as it will go...excess oil will be shot out into the rag...if none shoots out, I add just a bit more and repeat until it does (kind-of like: lather, rinse, repeat...except: add oil, check for squirt, repeat)...and by checking the damping oil level in this manner, we are also checking for probably the most important function of an SU carb: The free motion of the dashpot throughout its entire range of travel.

Damping oil fill level.
The "5-7 Second Test" [listed under Fit of vacuum piston] (Reference 2)
Quote from the manual: "The fit can be checked by plugging the air holes in the pistons [dashpots, 12] with for example small corks, placing them in the suction chamber [no separate number on diagram but it's the other big part of the 11 sub-assembly], and holding the parts upside down. The damping piston should be fitted, with an oil-film, but not filled with oil. The vacuum piston spring should not be fitted. The piston should normally sink to the bottom from the position shown [maximum dashpot travel] in 5-7 seconds."
The only quantitative test I've heard of for checking the Dashpot shaft...it effectively also checks the precision clearance between Dashpot OD and Dome ID (those surfaces, which should NEVER be subjected to ANY abrasive!):

Precision non-contact surfaces...the rate at
which air is allowed by these, affects Damping.
Dome and Dashpot were selected and matched at the factory and their interface
must not be changed by mere mortals!
From a FB thread about adjusting Carbs: "...check that both dampers bob up and down identically when you blip the throttle."
My response:
"Equal Dashpot excursion when blipping the throttle is the target, but it is not only determined by throttle linkage settings...since it is a dynamic condition, it is also affected by Dashpot movement and Damping, and that is a function of clearances and Damping Valve (Damping oil in both, and resulting action should obviously be the same [or very similar!])...what I'm trying to point out here is that if Dashpot action is not exactly equal when blipping throttle, first thing to check and adjust is throttle linkage [including Idle adjustment], but once those are as close to equal as possible, Damping needs to be checked to be equal, and that means doing the "5-7 Second Test" which checks clearance and precision of Dashpot tube with respect to tube in Dome, to see how close (or different) these are between the two carbs: http://www.sw-em.com/su_carbs.htm#5-7%20Sekunden%20Test ...again, if these are not precisely and absolutely equal, I recommend NOT making yourself crazy about it! Set for best similarity, and seek (moderate) adult beverage based therapy...done! Cheers."
Link to Volvoniacs thread on Damping oil: http://www.volvoniacs.org/forum/thread.jsp?forum=31&thread=4647&start=0&msRange=15
Link to Brickboard.com Thread: SU dashpot damping effect on mileage? http://www.brickboard.com/RWD/index.htm?id=709006
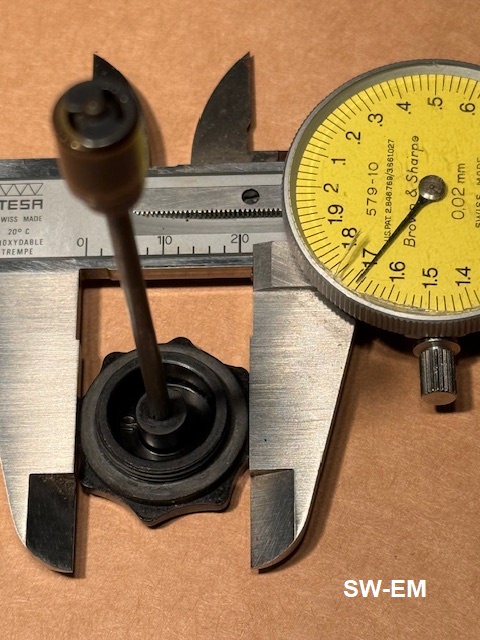
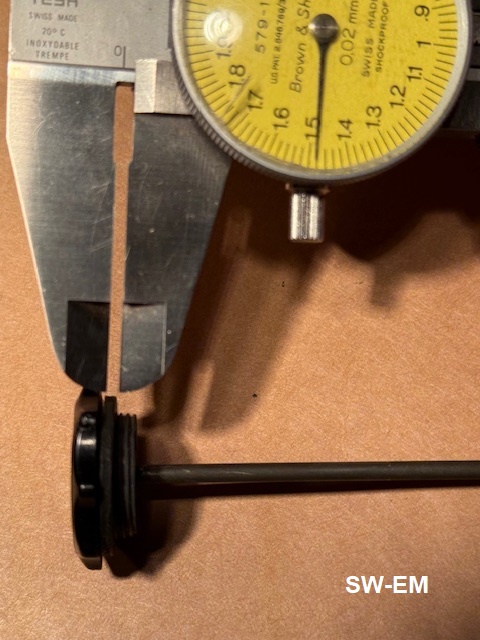
Damping Valve Assembly (15) This is a one-way (check valve) consisting of four components show below, which assures there is damping action when Dashpot(12) is rising against counterforce of Spring (14), and no damping action when Dashpot is falling. It does this in conjunction with the Damping Oil.
Damping Valve Function (Reference Graphic below).
Dashpot Rising: When Dashpot/Fluid are rising, floating Ring(1) is in contact with Valve Seat. A small [I measured this at 0.025" ] but important gap is located below Cylinder(2), between cylinder and Circlip(3), valve is therefore closed, and no fluid (other than the bypass leakage past Valve-Seat and Cylinder to Dashpot tube wall -see: The "5-7 Second Test") is allowed to flow. Here is where Damping Fluid viscosity determines flow resistance and thereby rate at which Dashpot is allowed to rise.
Dashpot Falling: When Dashpot/Fluid are falling (center), Ring is lifted off its seat (gap is then located above cylinder and Ring, between Ring and Valve Seat surface of Rod, and Damping Oil is allowed to flow past seat without restriction, through Cylinder and Circlip. As the oil encounters very little resistance, dashpot is allowed to fall quite freely [assisted also by the Damper Spring(14).].
Transition area: Dashpot can dither and vibrate madly if there was no damping oil, as it transitions between rising and falling (and more at idle where there is more time between pulses of vacuum!), and Gap relocates from below to above Cylinder. The damping oil slows the Dashpot response to the slow pulses, and also prevents wear from this incessant movement!

------------------------
My response to thread clarifying what oil in SU carbs does: http://www.volvoforums.org.uk/showthread.php?p=2183206#post2183206
"In the SU, Damping Oil both dampens the rise of Dashpot AND lubricates
its action (I've zero experience with, nor interest in, Strombergs, but I expect
since the design is similar in this respect, their oil likely serves similar
functions...)
...vacuum in the Dome liberates droplets from the Damping Valve and Reservoir as
Dashpot continuously rises and falls, and these droplets get into precision
clearance between Dashpot and Dome Tubes, lubricating this joint and its
continuous action in this way...and since the relocation of the droplets is
driven by vacuum, it also leads to a drop in oil level, as oil is (exceedingly)
slowly consumed (through vacuum holes in bottom of Dashpot).

Simplified SU carb showing Damping Oil Reservoir (1) with Damping Valve (2),
lubrication of Dashpot
Shaft (3)
and path for Consumption (4).
------------------------
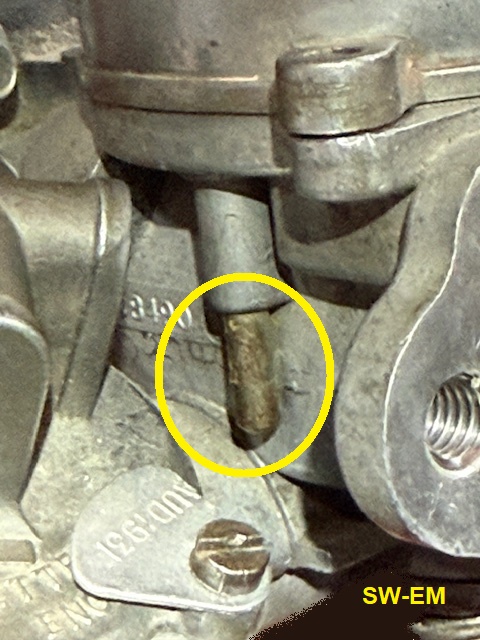
The damage shown below is what happens when force of a rising Dashpot acting on the Rod is too much for the plastic threaded Thumbscrew to endure (like from the explosive positive manifold pressure during a backfire). The viscosity of the oil and extremely rapid rise in pressure pushing up the Dashpot is so sudden and forceful, that Rod can be launched right through the Thumbscrew! Symptoms after this occurs are lean and possible rough running and lean backfire as there is no Damping action whatsoever.

Picture credit: Swedemash.
Cause for this may be too viscous a Damping oil not being able to flow the restricted (bypass) path around the closed valve fast enough, possibly made worse by cold temps or a (lean)Backfire. Link to related Thread: http://www.volvoforums.org.uk/showthread.php?t=241673
Excerpt from my response and recommendation: I recommend you check your Damping oil viscosity (should be 20W, not thicker)...also don't stomp on the accelerator pedal before engine is warmed up, resulting in a lean backfire. Also check your Choke is enriching as it should! (Repair Suggestion) You MIGHT be able to (super)clean the area, file some burs into the rod to give it some "tooth", push it back into its normal position, and epoxy it into place...otherwise, replacement is always an option, but check other things I mention or it might happen again with a replacement...!
--------------------
Thumbscrew of Dashpot Damping Valve keeps loosening.
It can happen, that maybe the Fiber Washer (16) is no longer in-place, having been (easily) overlooked during a past reassembly, and gotten lost, that the Thumbscrew will tend to self-loosen from the ever-present vibrations in service. If this happens, first line of correction should be to check for, and replace a missing fiber washer (a replacement one can be cut from "fish-paper", fiber reinforced resin paper, available in various thicknesses), to restore the slight load-up, and binding of the Thumbscrew as it is FINGER-tightened! This typically restores the intended function...but if Fiber Washer is actually present, and threads of the plastic Thumbscrew have gotten so sloppy after many times of being unscrewed for service, that the Thumbscrew still self-loosens in service, try cleaning the washer of the oil-film which is decreasing stiction [Combination of Static and Friction. See also: LINK] resulting in loosening, or just tightening it just a bit tighter (but NEVER with any tool but your hand, lest you break it and need to locate a replacement!!!)
See also: https://www.swedespeed.com/threads/su-question.696256/?post_id=8388841#post-8388841 [...besides calling the Thumbscrew "oil filler plug"...isn't there already one of these on the engine?, I don't like a suggestion in that thread, of securing the Thumbscrew with Loctite so much. (How does one remove it at next service time??...and there WILL be a next service time!). I wonder if the well-meaning poster who gave that advice also recommends loctiting the oil sump plug of a Crankcase? ...might as well when you have the Loctite out!].
Damper Thumbscrew Fiber Washer: If yours is lost, or even present and oily, so it allows your Thumbscrew to keep on loosening, the first suggestion is to deoil it, and its mating surface on the Carb, with some carb cleaner to reestablish some stiction. ...but if it is truly lost and not present, here are dimensions I took from a sample, with which to manufacture a replacement (of fiber filled resin paper, also "Fishpaper"....I measured in metric and have added calculated imperial equivalents. ...I don't know if Fishpaper is even available in that thickness...but the thickness is not critical, since its on a threaded Thumbscrew, so I bet one made of neoprene rubber gasket material would do the trick just fine too...or how about just an appropriately sized O-Ring!
Inner Diameter: (not critical, but important...it should barely clear the threads...a bit of interference would serve to prevent it coming loose and lost!): 17mm measured (/25.4 = .669" calculated)

Outer Diameter: (not critical either...it could be a bit bigger with little jeopardy!): 21.7mm (/25.4 = 0.854" calc.)
Thickness (not critical either...if it was thinner, or even thicker, the Thumbscrew would screw down a bit more or less...no problemo!) : 1.5mm = (/ 25.4 = 0.059", calc)
As the reader can see, the dimensions of the Washer are not critical, but the presence of something with stiction to lock the Thumbscrew and keep it from loosening with all the vibration present, IS!
--------------------
Link to British Volvo Forum Thread "HS6 Slippin?" http://www.volvoforums.org.uk/showthread.php?t=222689
----------------------------------------
Overflowing
Fuel Bowls: The fuel
feed is a low pressure (2-3 PSI) system with a simple Float and needle valve
controlling the flow into the fuel bowl
[but I prefer to call it a Bowl Valve, to differentiate it from the
Metering Needle, which sure looks more like a needle to me!!]. The
fuel supply system and expecially Bowl Valves must be nice and clean...if not,
any debris in the fuel, or wear on the conical end of the Bowl Valve Shuttle, or
even varnish build-up in the Valve body may cause the Valve not to fully seat
and shut off fuel. Unfortunately, and more often
than just occasionally, almost every vintage owner has seen the bowls overflow (caused
by contaminants or possibly moon phase, holding open the Bowl Valves)...it's
hell on fuel mileage when this is pumped out onto the street, to say nothing of
if some of the vapors are ignited by sparks at the brushes of the generator etc.
![]()
Here is an interesting link, (https://www.youtube.com/watch?v=zlez_hdoWYk )...originally about a (Mikuni) snow-mobile carb, but applicable to SU carb bowl valves as an overflow preventative, because as can be seen in the video, the bowl-valve components are absolutely similar to those of the SUs. The trick is to polish valve body ID with brass polish on cotton swab spun with hand-drill. I haven't tried this yet, but it seems valid to have the valve bore be as clean as possible...even polished(!) to prevent hang-ups resulting in overflowing...who knows what's hanging around on the valve wall...clever!...I will do this on the next incontinent carb I run into...and show the cotton swab here afterwards...stay tuned!

A closer look at the Bowl Valve components: LINK: https://www.sw-em.com/SU%20Carb%20Service.htm#Check_and_Adjustment_of_Fuelbowl_Floats
--------
Fuel feed pressure, that the carbs are exposed to, is (indirectly) lowered by spacer under the mechanical fuel pump...it decreases the excursion of the pump-lever by the camshaft lobe, so it is critical to replace this spacer when replacing fuel-pump. Caution!...spacer is made of brittle Bakelite. When installing a fuel pump, torque fuel-pump bolts evenly, and do not over-torque to prevent cracking this spacer.
Fuel flow blockage due to blocked jet tube. Even with a pre-pump and post-pump fuel filters installed, I've seen enough miniscule particles of (?) in the bottom of the fuel-bowl, that I don't know for certain, but swear there was enough contamination to affect the (vacuum motivated only) fuel delivery, as the vehicle exhibited fuel delivery symptoms only at high fuel demands, and the symptoms were cured after cleaning out the fuel bowls.
False Air. False Air is defined as air which enters the Intake, sucked in by the vacuum there, by a path other than past the Venturi, where it can be "measured" such that the corresponding correct amount of fuel may be dispensed.
Minor False Air High mileage SUs typically develop wear-gaps where the brass throttle shafts bear and wear against the light alloy bodies. This minor wear-gap doesn't noticeably raise the idle, but it still allows enough False Air to be ingested to give problems... (Refer to Graphic below, 1.), causing a lean mixture at idle, and this is typically compensated for by richening up the Idle mixture...which in-turn leads to an unnecessarily rich mixture throughout the entire operating range. Worn throttle shafts also cause inconsistent idle and difficulties in tuning in that they don't necessarily return to the same place...lubing the linkages helps, and is certainly recommended, but the proper fix is to rebush the housings to eliminate False-Air, and return the setting to a proper (non-compensating) point. Other sources of Minor False Air are caused by loose Carbs or Manifolds (2), or (rare, but possible) Manifold Gasket failure (3).
Because the amount of Minor False Air ingested is a function of inconsistent factors such as throttle shaft location, as well as manifold vacuum, trying to tune an engine while there are sources of Minor False Air can be a totally frustrating operation...
Major False Air needs more of an opening to atmosphere for air to enter the intake stream (like a compromised or dislodged PCV or Brake Servo hose 4). It typically manifests itself in a very high Idle (yet with Dashpot down at the Venturi, a highly unusual condition which should give the troubleshooter an immediate big hint!), but since fuel for a correct mixture is not being dispensed at the Venturi, engine does not make proper power and loading it with the drivetrain collapses the high idle to nothing, or stalls the engine altogether.

Normal Intake Air travels past
Venturi, where Fuel is metered,
False Air enters wherever it can
and will,
and since it is not passing the Venturi, fuel is not metered for it, so
engine may rev up, but not make any power with the lean mixture.
False Air past Throttle Overrun Valve: Not strictly the definition of False Air, because intake air is passing by the Venturi, a Throttle Overrun Valve not sealing correctly can result in a high idle (but with Dashpot raised, so proper amount of fuel is being metered...the action is the same as having an open throttle...because that what it effectively IS!). The cause of this raised idle is difficult to locate and impossible to correct without first either reseating TOV so that it seals correctly, or disabling it completely. If engine is idling high and carbs have TOVs, manually raise Dashpots (engine OFF!) and with a light-source, check a TOVs is not dislodged and open. See separate SW-EM Tech Article on Throttle Overrun Valve.
I recently found that Tom Bryant of Maine (https://thosbryant.wordpress.com/2014/01/02/su-carburetor-rebuilding-hs-6/comment-page-1/#comment-149 ) has an outstanding article detailing the inspection and rebushing operation which he performs as a service. I highly recommend the article for anyone considering this repair work themselves (special techniques and tooling are required!), to simply get an idea of what's involved in the procedure, or if one is considering paying him for this work, because the article makes clear all the areas he inspects and makes right, and the tools and techniques he uses...(money well spent IMO...no, he is not my cousin! See more on this below, in Links: Tom Bryant)
Cold-starting Link to Check your Choke tech article
Polished (Exterior Only!) Dashpot domes. Shiny is always faster!
"Velocity Stacks". Velocity stacks decrease the turbulence of the air ingested by the carbs...and presumable improve the atomization at the venturi...air filters should still be fitted...to prevent sucking in random debris (with decreased turbulence)! Stacks really only make a measurable improvement in the upper RPM range and Wide Open Throttle (WOT), at low revs, so it seems to me that they follow the "silicon breast-implant theory" explanation of their existence (don't do much, but look great!...and I'm kinda OK with that...). On the Yamaha developed engine in the Ford SHO Taurus of a few years ago, a servo-motor system controlled flaps as a function of RPM and changed the intake runner length from the long ones at low revs, to additional, parallel shorties at high revs. for additional optimization (and probably widening of the torque-curve).
Examples of stacks:

My freshly cleaned-up 1800 engine
compartment showing those impressive stacks (even with filters!).
------------------------
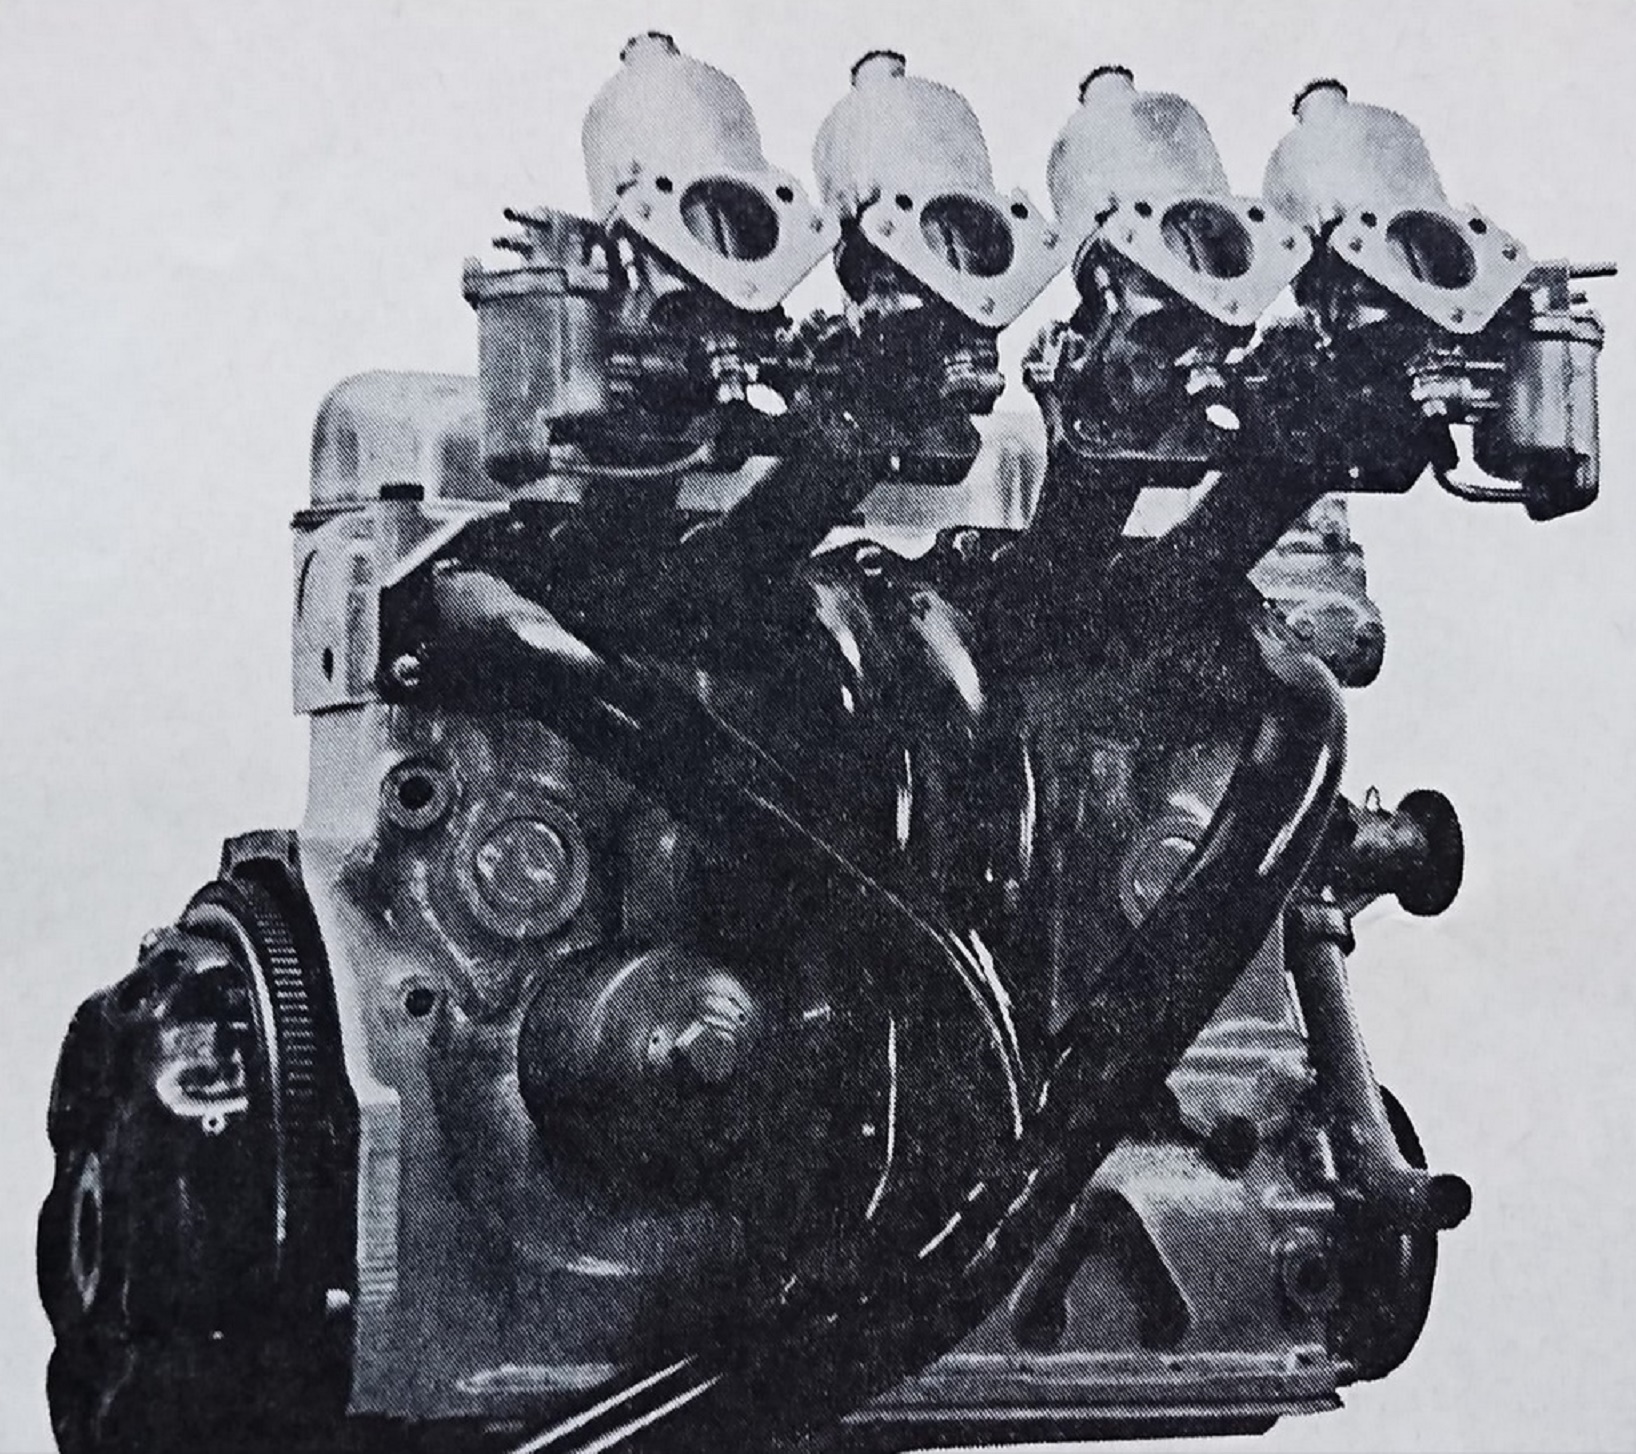
A couple of other, very different, but equally impressive use of stacks! We don't need no stinkin' filters. Suggested captions welcome!

From the count of the ignition
wires, is that really two V12 motors in
there...and, are there
three more carbs on the other side? Wow!
Picture source: (I don't remember, but I'm pretty sure it wasn't the
Smithsonian's site!)

Picture source: Uncle
Günther's 68th
birthday party.
See also: Links to Videos below!
Air-cleaners.
For better breathing, and/or higher change
intervals, use the "fat" stock "Late-Production" air cleaners. PNs:
672281-3 (Rear), 672280-5 (front, with PVC fresh air fitting). These
have three holes for the later three hole carbs, but can be used, with suitably
longer bolts, in two bolt earlier carbs either with separate nuts, or after
modifying the carbs with threaded inserts (see below) Link to threads :
http://www.brickboard.com/RWD/volvo/1009976/444-544/kohler_air_filter_elements_su_cleaners.html
http://www.brickboard.com/RWD/volvo/1262102/120-130/su_hs6_air_filter.html
Block the third hole with a dab of fuel compatible gasket silicon (Room Temperature Vulcanizer, RTV) to prevent rattles, and unfiltered air from entering carbs. For use with the velocity stacks, I fabricated a custom installation of those reusable foam types.
Threading Air-cleaner bolt holes. After dropping the semi-hidden nuts of the air-cleaner bolts for the nth time when trying to install them, one might consider upgrading the holes of the earlier carbs with threaded inserts...Helicoil or Pem inserts both work nicely. These make air cleaner removal or installation a one-hand, instead of two-hand-(plus occasional profanity) operation.

Carb flange with Helicoil retrofitted.
See Separate Tech Article: SU Carb. Adding Threaded Inserts for Air Cleaner Securing
-----------------------------------
------------------------
From Brickboard, in response to "Carb screws loosen?" thread posted by someone claiming to be "Drivin' in the Zone!" on Wed Feb 25 15:31 UTC 2004
Link to entire thread: http://www.brickboard.com/RWD/index.htm?id=760843
DitZ *;
The fibre washer (16) should be in place and provide enough friction to prevent backing off from vibration when the (Bakelite) dashpot screw is HANDTIGHTENED only (use tools, and you will surely break the Bakelite). I find it very unusual that Bob had success without them!
If fibre washers are not in place, threads are worn, dashpot screws are not tightened enough, or some combination of the above, this can allow vibration to back the screws away...in that case, try teflon plumbing tape or a little gasket goop of your choice on the threads to snug them up (NEVER Loktite!). Use of incorrect (too viscous) oil, AND a backfire can blow the damping mechanism pins right through the Bakelite (not so good)...but you have stated that you are using (one of) the recommended damping oils, so this cannot be the cause. Damping oil level (overfilling) is not likely to be the cause either.
Question: Does you engine have excessive vibration issues?
My recommedation: Assure your fibre washers are in place and not oil soaked, or damaged and not sitting flat, snug up the dashpot screws just a little tighter, if problem persists, use teflon tape or gasket goop on threads. Worst case replace daspot screw/damping mechanism assy.
[Exploded Diagram of HS6 was located here, see above]
* it seems that you picked a name, whose acronym inspires less than confidence!
Cheers
------------------------
Hot Starting an SU equipped vintage Volvo (Starting after a Heat-Soak): Comment added!
From Brickboard, in response to hot-starting difficulties and suggestions of installing an electric ignition system to improve starting.
Charles;
I'm not going to take exception to the info you give about 60s ignition systems
because its all true and correct...I will however take exception to redesigning
the ignition system on ONE car when thousands out there work just FINE.
Some failed component notwithstanding, the problem sounds like it MAY just be
the common difficult hot-start (or start after heat-soak) situation, which just
about all vintage Volvos have. When you have a computer with sensors all over
the place, the computer knows how best to start under those conditions, but for
ALL of my vintage Volvos where I'M the computer, the Hot-Start Procedure
[paraphrased from the Owner's Manual] is:
Ignition ON, No Choke, throttle(s) wide open and kept there, then crank until it
starts...back off the throttle as it starts and then blip it a few time to clear
the engine...works EVERY TIME!
[Well...if you have a good charge on the Battery, anyway!] Problem? What problem!
Cheers
------------------------
From Brickboard, in response to questions about configuration of SU carbs
Shane;
SU carbs are highly configurable in order to be suitable for just about any
vehicle you can imagine. The AUD XXXX numbers are the designations for the
different components which can change...for example, according to my SU book,
the jet for all HS6 carbs were AUD9148 (front), and AUD9149 (rear).
Once delivered to Volvo and installed those little tags (which probably served
to ID the carb configuration when inventoried) didn't do much any more, so were
usually lost the first opportunity...
Common vintage Volvo needles specifications (measured in .1" interval starting
from the mounting end shoulder. Needles are made of soft brass, so
measuring them with a hard-faced measuring instrument like a micrometer or
caliper is asking to scratch them, so not recommended!...if a close visual inspection does not reveal any
damage such as scratching, and rolling the (non-tapered) base on a flat surface,
while watching the needle tip for wobble or bending, they are probably fine):
KD: .099,.095,.0908,.0883,.0856,.0830,.0775,.0740,.0705,.0670,.0635,.0600,.0565,
ZH: .099,.095,.0915,.0893,.0870,.0847,.0820,.0795,.0775,.0755,.0735,.0715,.0695,
idle / pick & cruising / top speed
...so it looks like the KD is richer starting just off idle, compared to the ZH,
the other common metering needle used in Volvos.
Cheers
See also: http://home.earthlink.net/~goodspeeds/NEEDLES.HTM
------------------------
Simmy;
I agree with George on that...KA is a needle which I have NEVER seen or even
heard of in a Volvo application...it sounds like that carb may have originally
been on another car...my SU book calls for KA as the metering Needle for: ...I
just checked briefly and it doesn't call for this needle for ANY stock HS6
equipped vehicles!!!...but from checking the needle data (see below), it does
show, that the needle is more lean all throughout its metering range than the KD.
Following, are common vintage Volvo needles specifications (measured in .1"
interval starting from the mounting end shoulder. Needles are made of soft
brass, so measuring them with a hard-faced measuring instrument like a
micrometer or caliper is asking to scratch them and not recommended!...there's
nothing wrong with used needles if a careful visual inspection does not reveal
any damage such as scratching or bending.
Cheers
------------------------
Long Cranking during Starting Attempts after Extended Parking Times:
My posting to thread: P1800 Starting Issue: https://www.volvoforums.org.uk/showthread.php?p=2685160&posted=1#post2685160
Fuel system comments
and observations:
"(Early!) SU Float bowl are indeed vented to atmosphere, so when parked long-term
(a lot longer than overnight...more like two weeks!), the bowls do loose some
level due to evaporation [not to mention
the more volatile (the good stuff!) components of the fuel], but with a well adjusted and functioning Choke, I
don't expect this to affect Starting until after twice that long again (and
incidentally, the gum left behind can certainly be a contributing factor in the
Bowlvalve sticking and Fuelbowl(s) overflowing).
Fuel Pumps already do have (2) unidirectional valves...these valves, internal to
the FuPu work to allow only unidirectional fuel movement, but these sometimes
seal less than perfectly, so an additional non-return valve is not really
required (unless you want to "help out" a less than perfectly functioning FuPu)...less
than perfectly sealing internal valves, wouldn't become apparent immediately,
but over time (and this would be highly variable, including possibly
intermittent, based on the wear of these valves, and how, and how much they are
bypassing...this can make for frustrating troubleshooting of fuel supply
issues!), would allow drainback of what is in the line going to carbs, powered
by the weight of fuel in the column (but no more!...suggestion of bowls being
emptied by drainback is highly optimistic and fantastic IMO...I just can't see
how this can take place, since fuel drops into bowls, from the Bowlvalves, and
no uninterrupted fluid column exists with which to form a bowl-emptying
siphon!).
I like to add a final Fuel Filter (see-through or translucent) to just before
the Bowls...in addition to giving the obvious last line of particulate exclusion
defense, I can also monitor how long it takes during cranking before I see
replenishment squirts arriving...if it takes longer than a second or two, I know
those valves are bypassing, allowing drainback...
While troubleshooting a no-start due to no fuel condition on a looooong inactive
Triumph (sorry!), I saw an instance of a completely empty fuel line (even on the
intake side of the FuPu!)...so the FuPu had lost its prime, and was pulling I
suspect, against air in the line, so we just couldn't get any fuel movement
started...blowing into the fuel-filler of the tank during cranking attempts, to
make a little pressure to encourage initial fuel flow to the FuPu, and fill the
supply line with fuel instead of air solved that..."
---
Another Long cranking Time thread and story...this time on a "1...957 P445 Duett with the dual-SU carb B16B": https://www.swedespeed.com/threads/help-any-cure-for-overnight-fuel-draining-out-of-b16b-dual-su-carbs-and-long-crankover-time.671838/
My initial response, but the entire thread covers these and several other deficiencies the owner found and corrected, one at a time, so is worth reading! In the end, after correcting and adjusting his Choke, and fixing a weeping Jet, his feedback was: "...But, did that shorten the Cold-Start time? It was frosty this morning, mid 20's outside and about 40 degrees in my unheated garage. I pulled the choke fully on, waited until my watch second hand hit 12, and ...turned the key. it started and continued running smoothly in less than 2 seconds! Eureka!!":
""after sitting overnight it has to crank over for about 10 seconds with full
choke before fuel re-fills and then it starts" ...barring leaks, HS4 FuelBowls
are likely vented to atmosphere as HS6s which means that evap will take place,
but certainly not fast enough to empty the FB overnight, and
fuel
falls
into the FBs out of the open BowlValves, past an airspace, so it is impossible
for a siphon to empty the FBs...so my question is: Are the FBs really
empty? (I'd remove the lids and have a look!) ...or are we really talking about
insufficient Choke action (a cold engine with SUs needs full Choke to have any
chance of starting...cold SUs with low airflow don't atomize fuel very well)!
"mechanic familiar with British cars and SU carbs says all the old cars have
this issue, but somehow I don't think it's right. "...I don't dispute his
experience, but he is not proposing a root cause either!...I agree with you, and
in my own experience, long cranking is certainly necessary after long storage
time because of the evaporated fuel from the atmospherically vented FBs, but
never just after overnight...this suggests your FBs might be empty AND
Non-Return Valve(s) in the FuelPump are not fully sealing (and allowing a slow
drainback), so this will take some time cranking to refill (but unless someone
specifically explains to me how the FBs could be siphoned empty, I can't believe
this mechanism can empty the FBs!)...so I suspect your Choke is insufficient
(adjustment at carbs?, or lost motion of Bowden cables?)"
---
Start Procedure after Extended Parking Time:
Long cranking (without the engine firing and producing a power stroke on Crankbearing which have long-ago drained their oil) after extended (months) parking time, is not such a bad thing...while the Fuelbowls are being recharged **, and before the engine fires, the Oilpump is also pressurizing and preoiling the engine.
In-fact, my procedure for First-Start after prolonged inactive time, is to disable the Ignition, and crank until the Oil Indicator goes off, only then enable the Ign and Start.
** Just be aware, that the Bowl-Valves should be checked to be clean and free to close (and not to hang up on fuelgum or residue, causing overflow, as this is a likely time for this to happen! It's best practice to do the first start after a prolonged inactive time, with the hood open and a watchful eye on the carbs!
-----------------------------------
Metering Needles used on various engine configurations:

Position of Metering Needle in the Dashpot is also important! Its shoulder should be flush with Dashpot bottom surface, as shown here:
See also: Check Metering Needle installation into Dashpot

Checking Metering Needle position with a straightedge
Metering Needle Identification:
MN have punched-in profile markings on the cylindrical mounting area. It's good practice not to have these marking toward the Setscrew side when installing them into the Dashpot...this prevents obliterating the MN ID...and a dab of anti-seize on the securing Setscrews will also keep them nice and free to turn.

Confirming a ZH Metering Needle has been fitted.
----------------
Comparing SU Carbs - HS vs. HIF, 4 vs. 6 vs. 44, "Two Bolt" vs. Three Bolt":

SU Carbs Comparison as shown by IPD on the left...and they got it wrong...I
have added the "Two and Three-Bolt" versions for comparison, see also below!
If the point is to compare the 1 1/2" throat sized carb with the 1 3/4" throat sized carb...OK, but they got the nomenclature for the left one wrong...it could never be an HS6!...and the two carbs shown on the left, could never be interchangeable because of the size difference.
If the point was to show the difference between HS (side located Fuel Bowl) and HIF (Horizontal Integral Float)...OK, that is clearly apparent, but it would have been better to show that on two equal sized carbs.
I have added the similarly scaled picture of an HS6 to the right of IPD's picture and some reference lines, to allow comparing the carbs, and to hopefully clarify.
Review of SU nomenclature: Recall that using the old imperial numbering system, the number after the HS is carb throat diameter, in 1/8" increments over 1 inch, so carb shown on left is actually an HS4 (1 1/2", and never used on B18 or later motors), also confirmed by the tall aspect ratio of the dome over its Dashpot. At the throat, an HS6 would look quite similar to the HIF44 sized carb shown in the middle, where number following HIF is throat diameter in mm (because 1 3/4" equals 44mm...well, within a half of a mm anyway!). ...a minor point, but could have confused those it was not immediately obvious to, or those not intimately familiar with these carbs (I'm seeking help about that...I don't think it's working...!).
"Two Bolt" vs. "Three Bolt": This refers to the Air Filter mounting surface...the earlier version had two unthreaded holes for Air Filter bolts requiring loose nuts behind the flange to secure the Air Filter...keeping control of these nuts behind the Air Filters and not losing them, was always a bit tricky, and lead the good folks at SU to thread these holes in the later "Three-Bolt" version. This improvement can certainly be retrofitted onto the Two-Bolt carbs! See: SU Carb. Adding Threaded Inserts for Air Cleaner Securing There are a few other improvements which were incorporated in the Three-Bolt version...most notably the loose and separate Throttle Return tension spring of the earlier Two-Bolts, was replaced by an axial spring captured on the Throttle Shaft, on the later. Observant readers may take note of other minor design improvements...
----------------
1. [Specifications, carburettors, oil for damping cylinder] 1800s Owners manual, Page 24
2. [Fit of vacuum piston] 1800s Owners manual, Page 11
Link to Service Bulleting: Weather Protection Plate 419579 (keeps Ice from the front carb linkages): http://volvo1800pictures.com/wb/2/2_htm/23-19-%20February%201967%20Weather%20protection%20plate%20for%20throttle,%20B18B,%20B18D%20engines.htm
Link to separate SW-EM Tech Article: SU Jet Bearing and Supply Tube Notes
-----------------------------
Thread: Wohin kommt das Daempfungsoel im SU? http://www.volvoniacs.org/forum/thread.jsp?forum=31&thread=4647&message=40981&q=Daempferoel#40981
Suggested surfing...google on "SU dashpot oil"
http://www.aptfast.com/APT_Parts/SU_Parts/a_SU_components.htm
From: http://www.team.net/html_arc/healeys/200208/msg00720.html
<http://www.burlen.co.uk/>
The correct grade oil for the dampers in SU carbs is SAE20 which we
supply in 125ml plastic bottles @ #3.30 each.
-----------------------------
Why not try Penrite Damper Oil for SU and Stromberg Carbs? I
have 125ml for $5.75 plus S&H. Thanks and God Bless,
--Jon
Classic Auto Lubes
12803 CR 1222, Tyler, Tx, 75709
Ph:903-561-4858 Fax: 903-561-7177
-----------------------------
Tom Bryant's Blog with his EXTENSIVE AND DETAILED
EXPLANATION of an SU rebuild:
https://thosbryant.wordpress.com/2014/01/02/su-carburetor-rebuilding-hs-6
My posting to his site: "Tom;
I just visited this page for the first time ever, having linked in from a post
on the VOC forum (
http://www.volvoforums.org.uk/showthread.php?p=1880656#post1880656 ). My
highest compliments on your presentation, level of detail, general attitude and
inclusion of experience and reasons for using the materials and techniques
shown. This article and content is IMO the
GOLD STANDARD!,
as it includes not only the detail of work being performed, but also the reasons
and explanation WHY, making it the complete package…
To anyone interested; I would consider this article to be indispensable for
anyone considering working on their SU carbs themselves, and for those
considering having Tom do the actual work, it is abundantly clear to me he knows
what he’s doing, has the hard-earned experience, and I absolutely endorse his
rebuilding service (no, he is not my cousin!).
I think you and I could drink an adult beverage together…and should!…I’m buying!
I’ll look you up next time I get to Maine. Cheers from Connecticut!"
Recent Article by Tom: Why I Use Delrin Bushings for SU Carburetors
Link to separate SW-EM Tech Articles: SU Carb Throttle Plate Early vs. Late including Throttle Overrun Valve
------------
German site with good SU info: http://www.vergaserwelt.de/
CVI...good selection of SU spares. http://www.cvi-automotive.se/resdela/2e_carbs/02carb.htm
----------------------------------------------------------------------
John Twist presentations (University Motors videos) on SUs are a bit dated and not of the best state of the art quality video, but excellent and unparalleled. Grade: A+
John Twist - SU Part 1. https://www.youtube.com/watch?v=7GRAcqDySog
John Twist - SU Part 2. https://www.youtube.com/watch?v=60Bj_2cZQnc
John Twist - Matching Dashpot pistons: https://www.youtube.com/watch?v=IfU47Oqq9wA
John Twist - Centering the jet: https://www.youtube.com/watch?v=sxVFCY_1aSA
Link to video of SUs on a 122 featuring those delicious sucking sounds: https://youtu.be/dYAXMapjV5Y

Shorty Velocity Stacks are installed, but these completely invisible once
filters are in place...a nice, compact, effective implementation!
-------------------------
Delaware Valley Triumphs SU presentation. Grade: C- ...kind of disappointing, and not even in the same league as the John Twist presentations! Where Twist explains the theory perfectly so that one understands why SUs have the features they have, and what the adjustments mean and do, this presenter fails to do that effectively, leaving big questions and even giving in some cases, incorrect information...maybe he's just trying to drum up business for his shop instead of showing how a mechanic would actually perform the work...I guess for that, his presentation is effective as it leaves so many questions.
Presentations like this, frankly only add to the confusion and hatred of the SU carb! I usually shut up if I don't have something good to say, but I just can't here...see my nit-picky, opinionated comments, suggestions and corrections on his presentation, with timestamps here:
SU carb tech session at Motorcar Garage - Delaware Valley Triumphs SU presentation. Part 1. https://www.youtube.com/watch?v=NtBHJVhARPI
00:22 I disagree...Lucas components and harnesses ARE crap, because of poor design engineering, including reliability considerations, and poor quality of materials that they were produced with [add to that: Poor Engineering!]...I also disagree with presenter's comments on replacing harnesses...why do they need to be replaced in the first place?...copper does not go bad! Insulation of poor quality material (see above) gets hard and they need replacement for that reason...more importantly, crimps and terminals fail due to corrosion, but this is a different issue and not unique to Lucas components.
11:24 Jet gets dropped FIRST, when applying Choke, before fast idle cam raises idle (on Volvo application for sure, and I bet on MG application also...he just got it wrong).
19:30 Debris in the bowl is already past the Bowlvalve and so can't hold Bowlvalve open any more...the trick is to prevent it from getting to the Bowlvalve in the first place(!)...with a post FuPu filter (those inexpensive plastic translucent filters or better yet glass-bodied see-through filters are nice because when mounted high, just ahead of the carbs, they allow visual inspection of fuel flow to carbs).
24:10 If the Jet Supply Seal fails, only seal needs to be replaced, not the entire Jet! (Please don't sell me something I don't really need.) See: http://www.sw-em.com/SU_HS6_Jet_Supply_Line_Seal.htm
24:19 Black seal is of fuel compatible rubber and does not corrode! Anything on it which looks like corrosion is from the deterioration of the alu in the seal pocket (and this is also likely cause of any leakage). Cleaning of seal pocket and proper install technique is what is called for!
24:35 Removal of old seal is important (they will typically stick in seal-pocket, having more friction with crusty alu oxides in pocket than the plastic fuel-line), a dental pick should be used only extremely gently so that scratching and damaging seal-pocket is avoided (preferable is a softer toothpick). Once old seal is completely removed, inspect condition of seal-pocket, and super-clean pocket of all possible alu oxide products with a cotton swab until swab comes out clean! Only then is pocket ready for a new seal. See: http://www.sw-em.com/SU_HS6_Jet_Supply_Line_Seal.htm
-----------------
SU carb tech session at Motorcar Garage - Delaware Valley Triumphs
SU presentation. Part 2:
https://www.youtube.com/watch?v=q2VU5isGmvY
2:34 "levels of acceleration" is not various levels of air induction, "resulting in Dashpot height position" ...it's at various LOADS and THROTTLE that determine Dashpot height position!
4:12 ...this is exactly why wrong Metering Needles get into carbs: ...he says: "...you can kinda look at the chart....I think I'm going to go to an XXX needle". ...unbelievable, and entertaining!...what kind of a system for picking a needle is that? None! Metering Needles for a particular configuration of engine (mostly influenced by camshaft, manifolding - intake and exhaust flow) were arrived at after countless hours on the manufacturer's motor test stand (dynamometer), running at various RPMs, loads, throttle settings, ingested air temperatures and densities, and with exhaust gas analyzers sniffing the exhaust to see what is happening...(the factory published this here: Metering Needles used on various engine configurations . See also: Comparing Metering Needle Dimensions). Very few casual mechanics or even shops are equipped enough (mentally or hardware) to get this any better than the factory!...but they think they are!...so they'll try...and that's why incorrect Metering Needles are found in carbs! Do not change Metering Needles unless you can put motor/vehicle on a dynamometer to methodically and scientifically check the results...like so: (Reference: B18 on dynamometer) ...and if you feel the need to change the mixture slightly (for instance seasonal fine-tuning to optimize throttle response), adjustments should be limited to the Mixture Adjustment Nut only...no more!
5:04 "Dashpots sticking" ...wrong again!...them sticking is not typically a result of fuel varnish...no fuel gets to dashpot slide in operation...EVER!...and that's the only place dashpots slide...and they had better be lubed with oil...that customer likely had MN jammed to jets because of non-centering...a completely different issue!
5:52 "You might have to spray carb cleaner...into the orifice of the jet to clean out varnish that might be causing it to stick in there"...hogwash!...with the large clearances and huge amounts of fuel running through there (gallons and gallons...and half of every drop of fuel your engine consumes!), that is the last place varnish would form!...any sticking would be caused by MN to jet contact from not being centered...again, a completely different issue!
10:11 ...how much "potential wear" there is on these surfaces (Dome inner surface to Dashpot)? Answer: There is NO WEAR whatsoever because there is NO CONTACT...the ONLY contact is between Guidetube of Dome and matching Tube of Dashpot, and these should be clean and always lubed (with damping oil). See: SU Contact and No-Contact Areas
12:08 Centering jet is "very much a trial and error situation" maybe for him, but this is only the case when not using a Centering Pin. Any professional is not going to hunt and peck around, but will use a Centering Pin (or the MN itself)... see: http://www.sw-em.com/service%20notes.htm#Centering%20SU%20jets). He mentions use of a Centering Tool only later, and using that it is a finite process.
13:02 Spring loaded Metering Needles "it kinda takes care of (centering) itself"...but it does this by way of contact of MN in jet...and contact causes wear...which changes profile of needle...which eventually affects mixture and results in MN needing replacement...BAAAD [Not applicable to Volvo, as far as I know, no floating MN were originally installed on Volvos...that is not to say that someone got creative later...].
14:50 "two little cavities" in bottom of fuel bowls need to be cleaned...that's because they are the Fuel Bowl Sumps, intended to catch and hold any particulates, as a last chance to catch and keep these from jet and getting ingested into engine!
15:31 "one that's idled at 1200 and one that idled at 800" ??? actual idle RPM is a result of the carb with higher idle setting, because it predominates and determines idle RPM. If one carb was set to idle low and the other was set to idle high, the idle would be high, and different heights of Dashpot would show a difference in flow for the two carbs. Idle air into Carbs would need to be equalized a bit better at this point (Linkage or Throttle Adjustment).
15:50 Speaking of Fast-Idle or as he calls it, "high idle"..."when you pull out you choke, you don't get anything"??? ...a poor choice of words and explanation...I think what he means is you don't get any INCREASE IN IDLE. Jet dropping under Choke control, and Fast-Idle adjustment screw would need checking at this point.
22:07 "what does a leaking throttle shaft do?" ...he never once uses the terms "False or Unmetered Air"
22:40 "air that hasn't been mixing with the fuel" WHAT?...of course it mixes with the fuel when it gets sucked in!...the problem is that it is an air leak AFTER the venturi (definition of "False Air"!) so has no fuel metered for it...this results in a lean mixture...which is typically falsely compensated for to get it indicating right at idle, but this means an unnecessarily rich mixture throughout the entire operating range.
24:19 "a second screw which opens up the throttle for high idle"...the fast idle cam opens up the throttle for fast idle, the screw is the adjustment!
28:29 Mixture adjustment..."Trial and Error thing" he talks about raising and lowering the jet, but never mentions or explains this is in conjunction with MN, and how varies the orifice size which determines how much fuel is allowed to be dispensed.
29:55 "the manual tells you to put oil (non-specific) in there" ...no, the manual tells you exactly what weight of oil should be use in dampers...and that should be 20W Damping oil (or ATF, or MMO), because these are all similar in weight.
31:04 "Damper oil has a very minor effect on the performance"...that may be true, but it is a major issue if the dashpot has no oil...then it is not lubed...and this would cause accelerated wear and generally poor operation because there would be no enriching during increased load (accelerator pump effect)...possibly causing lean stumble or even backfire.
32:45 "if damper shoots up too quickly, you bog down because too much fuel gets in there" ABSOFREAKINGLUTELY WRONG! An undampened dashpot shooting up would cause a lean stumble because vacuum at venturi would rapidly be less and therefore less fuel would get sucked out of jet...slowing down damper rise enrichens mixture! This shows an utter and absolute lack of understanding of the function and enriching action of an SU Carb! John Twist on the other hand, covers this perfectly in Part 1 (Time: 6:10) of his SU presentation: https://www.youtube.com/watch?v=7GRAcqDySog .
End of my comments on this presentation.
----------------------------------------------------------------------
Reference Photo: This is how one determines what Metering Needles to install into your SUs...in a white shirt and tie (tucked in for safety, lest you get "wrapped up in your work"), but more importantly: On a dynamometer (either an Engine Dyne as seen here, or a "Rolling Road" Dyne, where entire vehicle with its engine running under load can be evaluated)! ...having a load on the engine is the key!

Per Gillbrand with B18 on a dynamometer ca. 1958.
--------------------------------------------------------
Reference Information Grose Jet Product Sheet:

-------------------------------------
As fuel is allowed into the Fuel Bowl by Bowl Valve, the air it displaces must be allowed to escape. Variations of Bowl Venting were fitted over the production years.

Typical Fuelbowl lid with Float, visible is bottom of Bowl Valve, Supply port
(without brass tube installed) and just below that, the Bowl Vent, a small hole
into the top of bowl volume.

Atmospheric Vent with cover. From behind this Vent is where fuel escapes when
Bowlvalve fails to close.

Fuelbowl lid with an oversized Vent...possibly some creative engineering (to
optimize fuel expulsion...?)...likely a later cover which had a tube for
venting, as shown below, and the vent tube was been removed...

Later Bowl Lid (from a 140 Model) with fuel line fittings (1, 2), and Vent (3),
originally routed to
fuel evaporative charcoal
canister [Correction: Air Filter,
which is better than almost anywhere else!], but can also be used without an evap canister, to vent to a safe area,
and route potential overflows away, instead of letting fuel spill uncontrollably
over the Generator/Alternator! Keep your Bowl-Valves inspected and
maintained, but this would be a good Plan B to have in place! See:
https://www.sw-em.com/SU%20Carb%20Service.htm#Inspection_of_Fuelbowl_Lids,Floats,and_Bowlvalves
--------
My response to a Faceplant
![]() posting to someone calling it an "overflow":
That's a VENT intended for fuel vapor capture systems on 140s...it only becomes
an OVERFLOW inadvertently, when Bowl Valve fails to close, which has been known
to happen(!), so it works out well to use these Bowl Covers on earlier cars, and
route the overflowing fuel (IF and when it happens!) safely away, rather than
letting it spill onto exhaust and or Generator, prompting the dreaded ECB18
(External Combustion B18)!
posting to someone calling it an "overflow":
That's a VENT intended for fuel vapor capture systems on 140s...it only becomes
an OVERFLOW inadvertently, when Bowl Valve fails to close, which has been known
to happen(!), so it works out well to use these Bowl Covers on earlier cars, and
route the overflowing fuel (IF and when it happens!) safely away, rather than
letting it spill onto exhaust and or Generator, prompting the dreaded ECB18
(External Combustion B18)!

Amazon with ECB18!
-------------------------------------
Webers?!? We don't need no stinkin' Webers!
SU Porn for Volvo owners!
Quad SUs on a B20!
-------------------------------------
External material attributed. Otherwise, this article is Copyright © 2004-2026. The terms Volvo and SU are used for reference only. I have no affiliation with either of these companies, other than to try to keep their fine products working for me, and to help other owners and enthusiasts do the same. Reminder: Gasoline is flammable! The results and procedures presented here are from my experience, and my own carefully considered opinion, and can be used and worshipped, or ridiculed and laughed at around the watercooler, at your discretion. Remember: You alone are in control of your future and knuckles!
As always, if you can supply additional objective info or experience, I’d appreciate hearing it, and will consider working it, along with the odd wise*** comment, into the next revision of this article. You are welcome to use the information presented here in good health, and for your own noncommercial purposes, but if you reprint or otherwise republish this article, you must give credit to the author or link back to the SwEm site as the source. If you don’t, you’re just a lazy, scum sucking plagiarist...and the Boston Globe wants you!
