Turnbuckle Fanbelt Tensioning for
Alternator/Generator
First Published Aug 2026 R. Kwas
[Comments/Additional Information added]
The Old, Slightly Rustic but
OK, Way to Adjust Fanbelt Tension (everybody's done it!)
The New,
Improved, and Significantly Less Rustic, Way to Adjust Fanbelt Tension
Reference Information:
Checking
Fanbelt Tension
Link to another SW-EM page:
Squealing Fanbelt
---------------------------------
Checking Fanbelt tension on your stock Generator or Alternator equipped B18 or B20 is a
part of regular maintenance, and
it is certainly also a part of periodic maintenance, of the SW-EM Alternator conversion.
If Fanbelt squeals ("like a pig"), especially for a few seconds immediately
after engine start, when load on Charging System is just a bit higher for recharging
the Battery with the energy which was just used for starting, it is time to
check and maybe increase the Fanbelt tension just a bit! ...but not too much!
Reference:
Checking
Fanbelt Tension
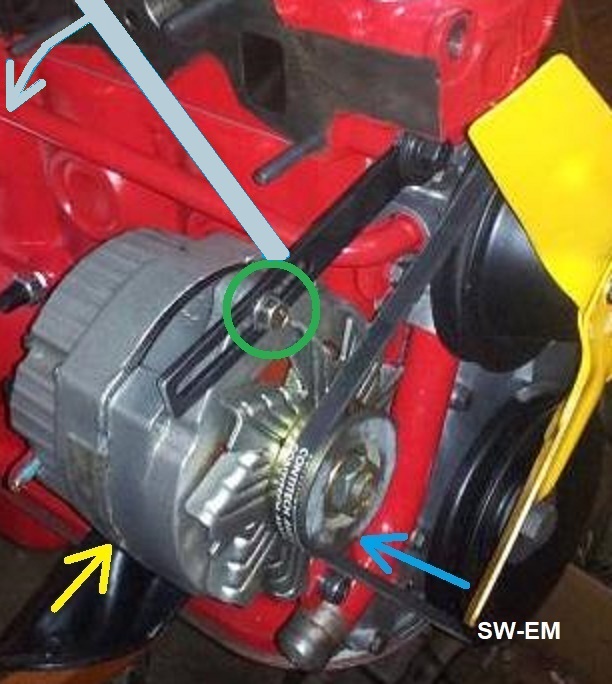
Typical original factory Fanbelt Tensioning Bar, black, rigid and
with an adjustment slot,
on a SW-EM Alt conversion. Using the
"Tommy Bar" from the OE toolkit (or your biggest
screwdriver or maybe even borrowing the
kitchen
broomstick, wedged
against
the engine
to lever the Gen or Alt away, after having loosened things to allow
adjustment, is the common
and
somewhat rustic
Fanbelt tension technique. [The
broomstick is photoshopped in,
in the picture above...because I
couldn't get it
away from its driver ( ) for an actual picture.]
The Old, Slightly Rustic
but OK Way to Adjust Fanbelt Tension (for installation with a simple, rigid,
OE, slotted Fanbelt Tensioning Bar): With engine
OFF, this would involve first loosening the
Alt Pivot Bolt Jamnut (at rear of Alt Bracket) a turn or two,
then loosening the
Pivot Bolt
itself in the front Bracket, slightly using a 5/16" Hex, and finally,
loosening the Locking Bolt on top of Alt, until the Alt could
just be moved slightly, and
pivoted to vary the Fanbelt Tension. This is where the long screwdriver or
shop broomstick lever come in...they would be placed between Alt and engine and
the Alt levered away to increase Fanbelt tension. Then, while holding the lever such
that the Fanbelt Tension is as desired, retightening the Locking Bolt at the
same time...snugging the Pivot Bolt below, verifying
satisfactory tension...and IF this had been achieved, tightening the Pivot
Bolt to final torque and finally locking it into place with the Jamnut.
Several installers of the SW-EM Alt Conversion think this rustic manner of adjustment
can be improved upon [I can't disagree!]...they have
made
a major change to the original, simple Fanbelt Tensioning Bar design, and I thought it was a good time to
present it here, as it is truly a sharp looking, and functioning, design
improvement, which I will be offering as
an option to the Alt Kit
[all components are not yet in stock,
but that is the goal!]. Instead of a simple slotted Bar which extends from the
cylinder Head to the top of Alternator, and which is locked when the Tension has
been set, this new design actually helps the mechanic to set the Fanbelt
Tension accurately and in a continuous infinite adjustment, by simply allowing a
Turnbuckle to be turned, lengthening the
assembly and this obviously results in tightening the Fanbelt, in an easily controlled
manner...gone is the ghetto practice of using the longest screwdriver from the toolbox, or even
the operator-end (not the bristle-end!) of the shop broom, levered against the engine,
for this operation!
Naturally, this arrangement can certainly be retrofit
onto the original Generator installation also.
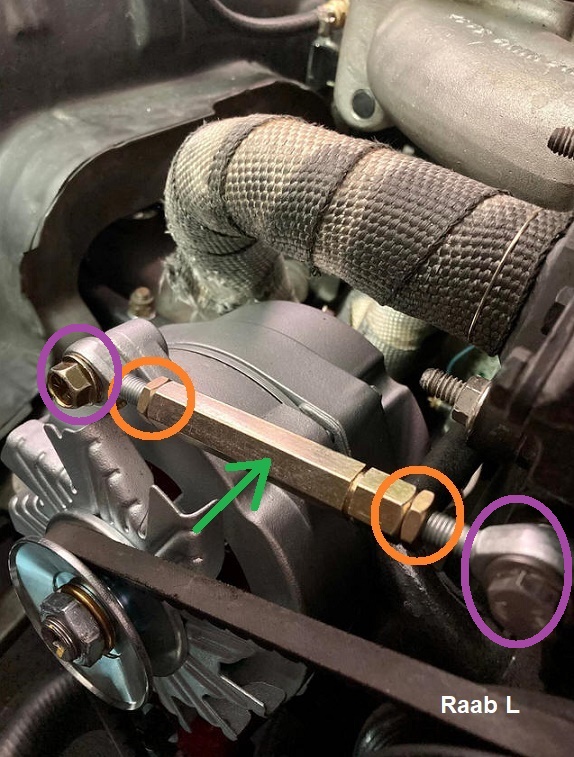
Turnbuckle version of Fanbelt
Tensioning bar, with Heimjoint
ends, which because of their spherical end bearings, compensate for
slight angular misalignment because the Cylinder Head mounting surface is not
perfectly coplanar with mounting
surface on the Alt. Jamnuts lock the Turnbuckle
rotation when adjustment is satisfactory.
Raab LaFleur pictures shown with his kind permission.
The New,
Improved, and Significantly Less Rustic Way to Adjust Fanbelt Tension Replace the simple Fanbelt Tensioning Bar with a
Turnbuckle based, supergroovy Fanbelt Tension Adjustment Bar
(FTAB): Loosen Pivot Bolt Jamnut
a few turns, then Pivot Bolt,
slightly,
then both Jamnuts on FTAB
Turnbuckle. Then simply turn the Turnbuckle in small
and infinitely adjustable increments, to lengthen the FTAB with one
hand, while monitoring the Fanbelt tension with the other. That's
it! ...when the desired new tension is achieved, locking all the hardware in place
in the reverse order,
until next time... It's almost as simple as adjusting the anti-sag turnbuckle on your barndoor! What's not to love?
Another version of the Turnbuckle Solution:
Here, on a distributor-side Alternator installation (so likely in the UK), the
owner has changed the rigid OE Tensioning Bar, to an (open-style) turnbuckle
based, variable-length, threaded rod with loop ends. These are
simpler/less expensive than Heimjoints, but also not as forgiving of
misalignment.

Enzo R Scolla picture.
--------------
Additional Pictures:
Raab LaFleur's Heimjoint/Solid Turnbuckle solution. Pictures used with his kind permission.
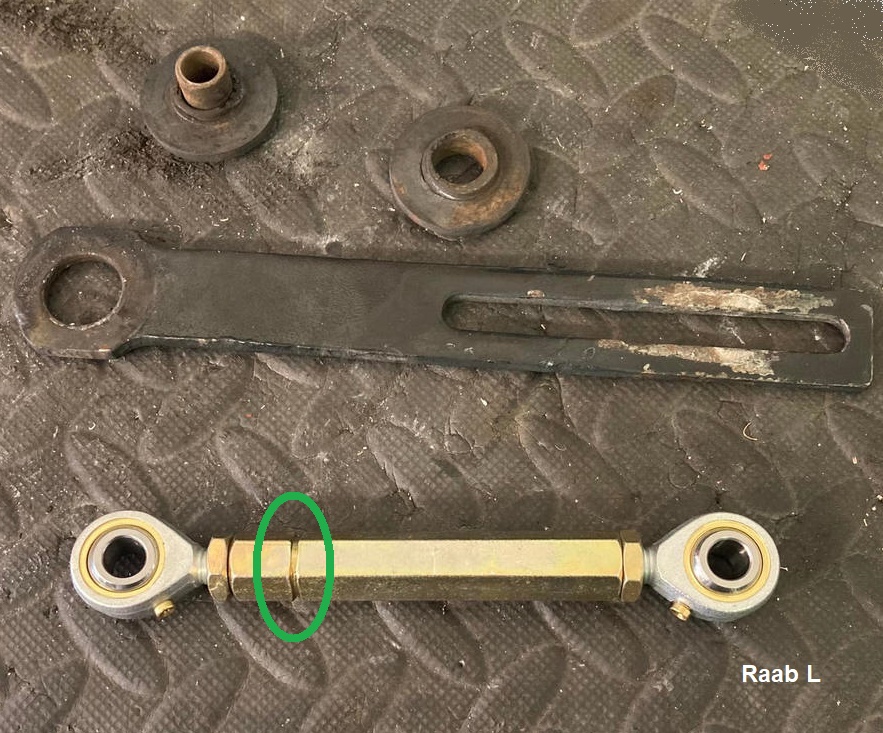
Old, factory original, and new, supergroovy adjustable link based on Heimjoints
and a Turnbuckle...no more broomstick lever between
the Gen/Alt and engine for Fanbelt tensioning! A 1/2" open end wrench is a lot
less rustic and will adjust Fanbelt tension with precision! ...BUT, after
installing a Turnbuckle tension adjustment, and you have all that advantage over
the adjustment, Don't be tempted to over-tighten your Fanbelt! ...your Water Pump Bushing
wouldn't appreciate it! Ref:
Checking Fanbelt Tension. For reference, the additional
notch in the Turnbuckle is the
left-hand thread side!
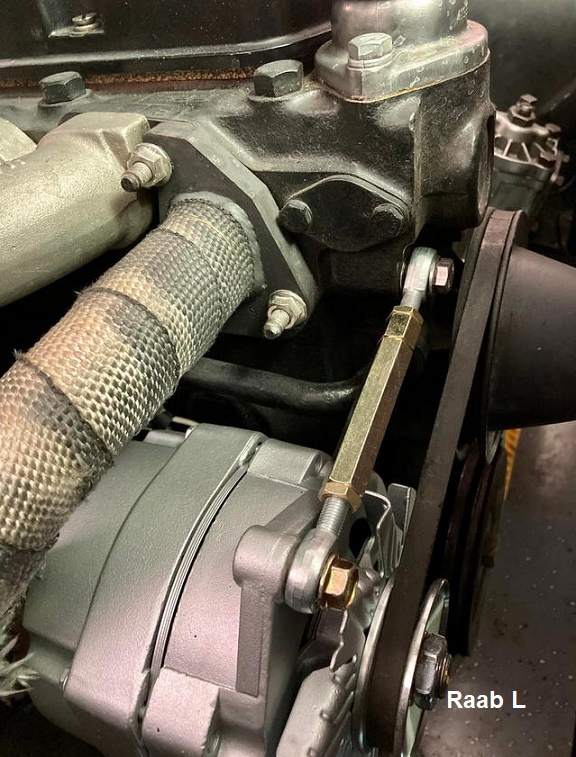
NICE work Raab...I like it!
--------------------------------
I have located and am stocking a limited number of
Turnbuckle Fanbelt Adjustors, and
making these available on the SW-EM Kits
page! [...in the works and not yet available! ]
--------------------------------
Additional:
Heim or Rose Joints, or the more generic "Spherical Rod Ends":
https://en.wikipedia.org/wiki/Rod_end_bearing
My response to
 comments
doubting and questioning the strength and suitability of using a double
Heimjoint ended Fanbelt tensioning arrangement shown here:
comments
doubting and questioning the strength and suitability of using a double
Heimjoint ended Fanbelt tensioning arrangement shown here:
"To those who don't think it will be strong enough, I remind them that this link
only locates the top of Alt for the purpose of setting Fanbelt tension...and
AFTER Fanbelt tension has been set, the Pivot below should
[must] be tightened and
locked to hold the entire mass of Alt in place...point of fact, this link could
be removed after pivot is locked (not that this is recommended, but strictly
looking at this from a standpoint of mechanical analysis!)...Alt mass is NOT
supported by this link normally...only IF the pivot loosens or is not tight for
other reasons! That's why link should obviously be present and its locking nuts snugged...it is a BACK-UP, but not the primary securing feature! "
Once Pivot Bolt of the Alternator is locked, the Alt Housing is positively
captured and prevented from moving and loosening the Fanbelt. One would
actually be fine with no Fanbelt Tensioning Bar in place, or it removed!...that
is not to say the author recommends this, but in the mechanical analysis, its
presence gives an added safety margin to the assembly (given all the vibration
input from the Fanbelt), and loaded in compression
as it is (pushing the Alt Housing away from the engine), thereby tightening the
Fanbelt, it is strictly static and doesn't do much (any!) work at all! All it
does is add a second mounting to the Alt, preventing an unsupported,
cantilevered mass, from vibrating with the input from the Fanbelt, which it
would certainly want to, with only the pivot as a support.
Made in china?
The china-made Heimjoints are only actually being used for their pivoting
ability during adjustment. The assembly is under high
compression forces from the tight Fanbelt, while Turnbuckle and Jamnuts are being
tightened, but after that, and once the hardware is locked in place, it's not
like the Heimjoints are moving (and wearing) in service, and doing much.
The assembly is completely locked and static, not moving (or wearing)...so the
Heimjoints have it quite easy between service intervals! I expect even chinamade
Heimjoints will stand up to this duty!
* Although it pains me greatly to use these parts in a Volvo, I'm hoping they
will not disappoint as parts, tools and assemblies from there often do... They seem made well
enough for static duty, but my position is that I am taking a chance on these
components as much as it pains me to install them...their approval by the
SW-EM Product Evaluation Department (SW-EMPED) is on
probation...watch this space!
Link to SW-EM
Turnbuckle Alt Kit Accessory on SW-EM Kits page.
[...in the works and not yet available!
E-mail for status off availability for this up-grade accessory!]
---------------------------------
Reference Information:
Two official techniques of checking Checking
Fanbelt Tension after adjustment...or during service, to see if it needs
adjustment...most experienced mechanics do this by feel
[Engine OFF!! Work safely!!]:
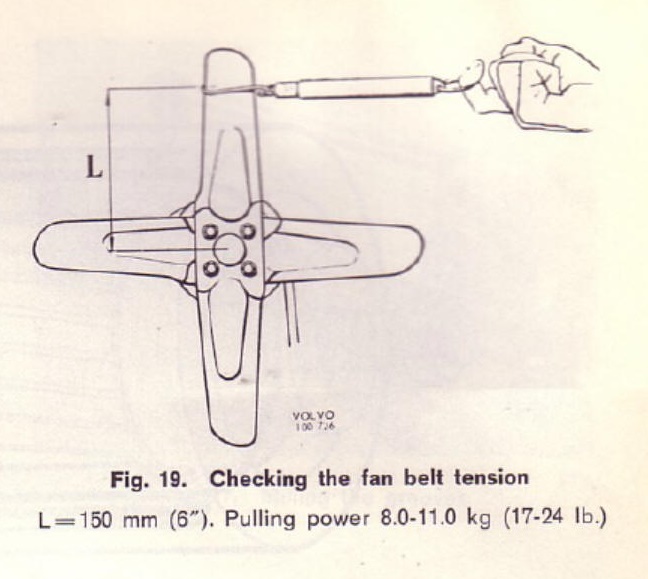
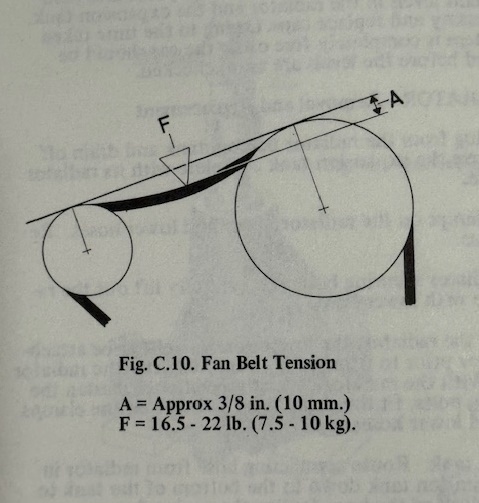
Both from the Volvo Service Manuals.
Beware:
Over-tightening the Fanbelt like an E String on a violin will make life
unnecessarilly difficult for your Water Pump Pulley (it's just made of formed sheetmetal!), and
in the worst-case, can lead to this part fatiguing and its hub separating from
the rest of the part.

Failed WaPu Pulley. An Over-tightened Fanbelt contributes to this!
Repeating the Friendly Tip: Don't Over-tighten your Fanbelt!
--------------------------------
A word about Fanbelts:
Fanbelts really can take (and give) a lot! ...the Chevrolet Corvair
[Americas rear-engine answer to
Porsche!] comes to mind, as a particularly interesting case when the
fanbelt is considered!
Let's
take a lap with the fanbelt starting at the
ventilation impeller located
prominantly on top of the horizontally opposed, also: "boxer" configuration
engine (going clockwise):
Leaving here, it makes a 90º Axial Twist, then a 90º turn over an
Idler pulley, making another 90º
Axial Twist, then
down to the Crankpulley,
around that 180º, then making another 90º Axial Twist, and back up where it makes another a 90º turn around
the Generator pulley, then another
90º Axial Twist and back around the
ventilation
impeller 180º to complete the lap...I understand they had issues keeping them taught, but
it demonstrates that the belt can take a lot (see also comment below!), as long as you
don't ask it to do that in too short a distance between pulleys, or be misaligned doing it...!
Note that the length over which the belt makes the Axial Twists is
(est.) more than 6"...that's not asking too much of the belt, which is still and
after all, just a fiber reinforced rubber band!
Routing on a '60s Chevrolet Corvair
[...with Regards to
Ralph Nader, author of "Unsafe at any Speed"]:
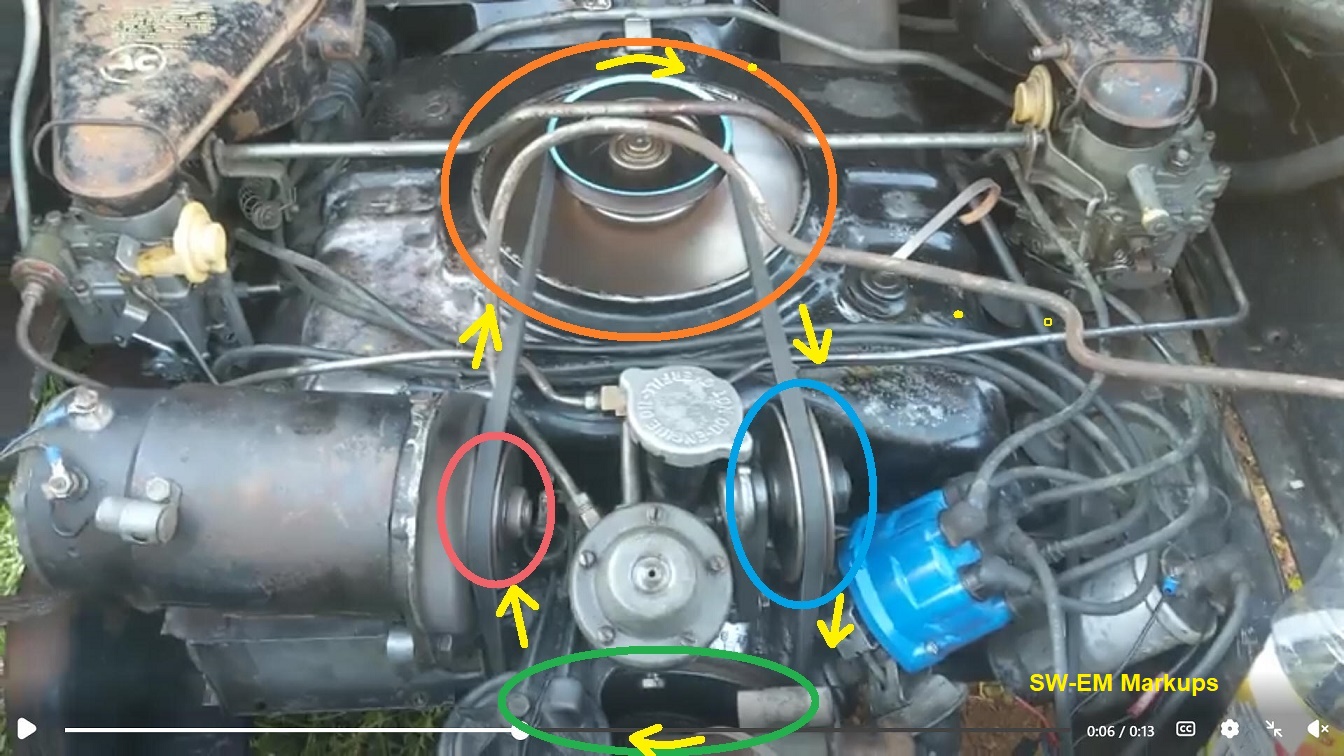
Chevrolet Corvair engine compartment showing Fanbelt routing only second to
routing in a Black Forest Kuku clock! Screen capture from a video. Source:
LINK
One poster to the video commented:
"I have never seen a Corvair
without a spare belt in the trunk. That being said I have yet to find someone
that needed the spare belt. I imagine most people think the belt won't last long
but in reality the belt is more than happy running for a long time like this. "
In researching the Corvair, I wondered what ever became of Ralph Nader's
campaign against it, and found this interesting discussion:
Bottom Line: "The Corvair was completely EXONERATED of all of the false accusations claimed
by attorney R. Nader" Good Job
Ralphie!
Source:
LINK
" ...the Corvair was thoroughly investigated by the
NHTSA – National Highway
Traffic Safety Admin.
Report summary:
“In September 1970 the National Highway Traffic Safety Administra tion (NHTSA),
Department of Transportation, began an evaluation of the handling and stability
characteristics of the 1960-1963 Corvair vehicle, beginning with review of
General Motors Corporation documents and test data. The existence of some of
this information has been called to the Government’s attention by Mr. Ralph
Nader. Analysis of General Motors documents, technical literature, and all
available accident data was followed by a concentrated program of Government
testing of the Corvair and contemporary vehicles during the spring and summer of
1971. Input-response type dynamic tests which could provide qualitative data,
were selected for this comparative test program. Support for the tests,
conducted at College Station, Texas was provided by the Texas Transportation
Institute (TTl). Texas A&M Research Foundation. Testing was completed by July
15, 1971. Test data were reduced by TTl during the late summer and fall of 1971,
and NHTSA analyzed the data as it became available. Evaluation of the extensive
data obtained from General Motors and from other sources, analysis of the NHTSA
input-response vehicle test data, and recommendations from the Advisory Panel
emlployed in this case indicate that: The 1960-1963 Corvair understeers in the
same manner as conventional passenger cars up to about 0.4g lateral
acceleration, makes a transition from understeer, through neutral steer, to
oversteer in a range from about 0.4g to 0.5g lateral acceleration. This
transition does not result in abnormal potential for loss of control. The
limited accident data available indicates that the rollover rate of the
1960-1963 Corvair is comparable to other light domestic cars. The 1960-1963
Corvair compared favorably with the other contemporary vehicles used in the
NHTSA Input Response Tests. The handling and stability performance of the
1960-1963 Corvair does not result in an abnormal potential for loss of control
or rollover and it is at least as good as the performance of some contemporary
vehicles both foreign and domestic.”
Source:
United States. Evaluation of the 1960-1963 Corvair Handling and Stability.
Washington, D.C.: National Highway Traffic Safety Administration, 1972.
The Corvair was completely EXONERATED of all of the false accusations claimed
by attorney R. Nader." [Nice try
there, Ralphie! ...but it worked to make a name for yourself, which was
probably your goal from the outset...!]
------------------
...but Fanbelts even just running in a perfect plane, like in the Volvo
installation, can't take everything and anything that might be
expected of them, or comes their way! Reference this feedback from a SW-EM
Alt kit installer:
Shredding
Belts on an Alt installation
------------------------------------------------------
External material
sources are attributed. Otherwise, this article is Copyright © 2026.
Ronald Kwas. The term Volvo, Bosch and names of other suppliers shown here
are used for reference only. I have no affiliation with any of these companies
other than to keep their products working for me, help other enthusiasts do the
same, and also present my highly opinionated results of the use of their
products here. The information presented comes from my own experience and
carefully considered opinion (and fruitful little gray cells), and can be used (or not!), or ridiculed and
laughed at, or worshipped, at the readers discretion. As with any recipe, your
results may vary, and you are, and will always be, in charge of your own
knuckles, and future!
You are
welcome to use the information here in good health, and for your own
non-commercial purposes, but if you reprint or otherwise republish this article,
you must give credit to the author or link back to the SWEM site as the source.
If you don’t, you’re just a lazy, scum sucking plagiarist, and the
Boston Globe
or maybe
Harvard wants you! As always, if
you can supply corrections, or additional objective information or experience, I
will always consider it, and consider working it into the next revision of this
article...along with likely the unique metaphor
and probably (likely) wise-a** comment, if I can possibly work it in!.
