
Pedal Position Sensing Brake Light Switch Variations on 122 Models
Jul/24 R. Kwas (updated continually) [Comments added]
---------------------------------
Brake Pedal M40 vs. BW35 vs. LHD vs. RHD vs. Factory Mounting Holes vs. No Holes...
As simple as the Pedal Positioning Sensing Brake Light Switch (PPSBLS) Kit might be in principle, when you have put yourself in a position to offer this option for both LHD and RHD, and also for M40 and BW35 equipped chassis, which were possibly prepared, possibly not prepared for a bracket to accommodate this feature by the factory, as the author has, it gets complicated! Each of the first four variations listed above can result in a different pedal configuration...and this does not mention how this is also affected by automatic to manual shift conversions done by later owners, and that the factory included mounting provisions in the Pedal Box for their solution, because also the different width of the transmission hump, which typically does not change with a conversion...its almost confusing! If the reader is confused, just try to imagine how the writer felt while he was writing about this in a way that a sane person could follow...
I have collected the variations here so that owners interested in making this upgrade/improvement can see and be aware of them, and compare them to what they see, and actually have(!), in their own driver's footwell, to let me know when ordering. This should minimize confusion and errors which have previously occurred, resulting in me sending an incorrect bracket...or...you could just send a picture of yours when considering making the change!
LHD Variations
LHD
M40/41
LHD BW35 Chassis
LHD After BW35 - M40/41 Conversion
RHD Variations
RHD M40/41
RHD BW35
Pedal Linkages Compared
Switch Plunger to Pedal Box Sidewall
Dimension
OE
Mounting/Pivot Hole Provisions in the Pedal Box
SW-EM
Kit Pedal Position Sensing Brake Light Switch Options
Option A Installation
Option B Installation
Close Quarters Drill
Reference Information
Eyebrow Auto Brake
---------------------------------
PLACEHOLDER FOR LHD M40/41 <'66 Chassis pic (Hydraulic Brake Light Switch) with no PPSBLS installed...I guess these are getting a bit rare, as many engaged Amazon owners/operators have taken my advice and switched over to the PPSBLS...that's smart!...but if you can help with supplying a picture before such an upgrade, thanks!
LHD BW35 Chassis (>'67) as originally built by the factory. A "Lefty" Bracket locates the PPSBLS. Note: Rectangular Brake Pedal Arm extending down from Pivot Bolt with a slight jog to the right (since the Brake Master Cylinder is on the left in this configuration), and Auto Shifter Shaft extending down through firewall, next to the Steering Column.
LHD After BW35 - M40/41 Conversion:
Russ Prior pix, shown with his kind permission...pic of a footwell of a chassis which was originally delivered with a BW35 installed (so wide transmission hump), subsequently converted to manual...the Pedal Pivot Bolt has had the Clutch Pedal added. In fact, the entire Pedal Pivot Bolt with both Clutch and Brake Pedals has been swapped over (including relocating the Brake MC to the right, and adding the Clutch MC on the left), since the stock Brake Pedal of a LHD BW35 equipped car would have been a solid beam, as seen above.

LHD BW35 Chassis which has been (nicely) converted to clutch and manual
gearbox, by
installing the entire Pedal Pivot assembly. Note the tight clearance between
Steering Column and tubular Brake Pedal Arm.
See Russ's Option B Installation.

RHD M40/41 >'67 Chassis...view of Pedals, with a good view of placement of OE installed
PPSBLS on OE bracket
672973-5 [but the original style switch without sleeving on wires
visible, so a retrofit, and not a SW-EM Kit!]. M40/41, tubular Pedal Arm cross-sections are evident.
Picture source: ?

RHD BW35 Chassis with solid beam Brake Pedal Arm. Brake Pedal is on
the right side of Steering Column and must make a jog to the left to allow
additional clearance room
for the Throttle Pedal.

RHD BW35 Chassis showing jog in rectangular Brake Pedal Arm,
and its location on the right side of Steering Column. A jog to the left
is necessary to clear the Throttle Pedal on the right.
RHD BW35

To clear the Gas Pedal in the RHD BW35 fitted chassis, the solid beam of Brake
Pedal makes a little jog to the left (not to be confused with the
Time-Warp!)
Switch Plunger to Pedal Box Sidewall Dimension:
LHD BW35

Dimension
measured by Eugene Abbondelo, picture shown with his kind permission:
D = 24mm, and it looks like the "jog" starts below Pedal
Box, so Pedal Arm remains parallel to inside wall of Pedal Box with a constant
24mm separation compared to the graphic for RHD above!
OE Mounting/Pivot Hole Provisions in the Pedal Box:
The oe bracket mounts by way of a pivot hole, and a hole for a securing bolt. In the factory prepared cars after about '67, the securing hole has a captive nut welded onto the side of Pedal Box. This means that a single installer in the footwell could install the bracket with switch, adjust and lock it in place. This is a nod to an efficient Swedish production process. When these mounting provisions are not in place, they must be retrofitted...and since we do not have a captive nut on the engine compartment side of the Pedal Box, we might need the help of a second person to hold the loose nut while we tighten from inside...
LHD:
![]()
Pedal Box LHD [not an actual picture but
an Image generated by mirror imaging a nice clean RHD image], that's also why head of
Pivot Bolt is visible, instead of nut, which would normally be visible in an
actual picture.
If the chassis was prepared with mounting provision, but the PPSBLS was not yet installed, as was the case in late '66 chassis, the holes were sealed, as seen below.
RHD:

RHD late production with OE holes, but no factory bracket installed, visible are
(highly oxidized) rubber plug, and bolt in
captive nut (1/4"-20 thread). This allowed bracket to be installed
and adjusted in a one-man operation from footwell. Big hex visible is the Pedal
Pivot Bolt obviously present on all versions.

Same Pedal Box viewed from footwell with no bracket installed at factory.
Lower hole has a 5/16" bolt threaded into captive nut on the outside, upper hole has
rubber plug (purpose of both is
to seal the openings to the engine compartment which would allow heat and noise
into the passenger compartment).
-----------------------------------
SW-EM Kit Pedal Position Sensing Brake Light Switch Options A and B:
Option A Installation, employs a stainless steel bracket, but is simpler to install than the Option B (OE) solution.
A good pic of Brk Lt Sw Option A installed (a bit simpler installation, but clearly not OE in appearance!).

Option A Brk Lt Sw installed by
Michael Crabtree, and posted with his kind permission. Further, I have explained to
Michael, that the formed wire clip visible around Steering Column at Firewall is
intended to hold a piece of lightweight open-pore foam, for the purpose of
sealing the opening and not allowing noise or engine compartment hot air into
the passenger compartment.
Option B Installation, is a stainless steel clone of the OE bracket of Righty or Lefty versions as seen here and above. If holes in the side of Pedal Box are not present (which would make installation a breeze, not counting the contortions necessary!), they need to be retrofitted, which requires special tools (a Close Quarters Drill) and techniques.
Russ Prior's installation of the Option B (oe clone) Pedal Posit Sensing Brk Lt Sw.

View from the engine compartment side, of Russ P's Option B (oe)
installation.

Picture by the manufacturer. A tool such as this cordless, variable head
angle (including a full 90Degrees), makes drilling into the side of
the Pedal Box simple and straightforward! I recently also ran across this
other budget version option:
LINK

Contortionist view of the installation. Note also the general sound
deadening, and foam surround on the Steering Column, secured by the formed wire
clip. Russ's passenger compartment is as cool, quiet and free of engine
compartment smells as it can be!
He reported: "My brake lights work better than ever and appear to be a lot brighter than before the switch installation. Is that possible?"
My explanation: "As far as being "brighter than ever"...the only way I can explain that is if the contacts [or ancient push-on connectors] of your old Hydr Brk Lt Sw exhibited an in-line Resistance, even when closed [this would drop some Voltage in the current path, and result in a lower V applied to the brake lamps when they were powered] (which is certainly possible, even probable(!) with the carbonization of the contacts of the old, slow-closing action of the Hydr Press sensing sw...
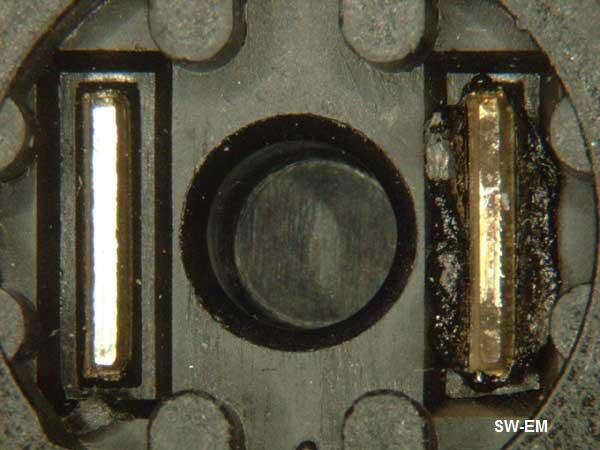
A failed Hydr Brk Lt Sw after a very short service life. One
virginal contact, one contact already exhibiting carbonization and overheating!
...see also here!), so the brighter Brake Lights [with wiping/self-cleaning contacts of the PPSBLS] are a good side-effect which no-one has previously taken note of and reported...but is certainly another positive selling point for the Pedal Posit Sensing implementation! "
-----------------------------------
Speaking of Brakes and Brake Light Switches...from the "Always-Staying-on-top-of-New-Products-for-SW-EM-Readers-Department".
Notice: The SW-EM Pedal Position Sensing Brake Light Switch Kit is guaranteed to light your Brakelights earlier than your original brake system hydraulic pressure monitoring Brake Light Switch ever could, including if you have installed the super advanced Eyebrow Auto Brake from Yugoslavia!
Source: Popular Mechanics
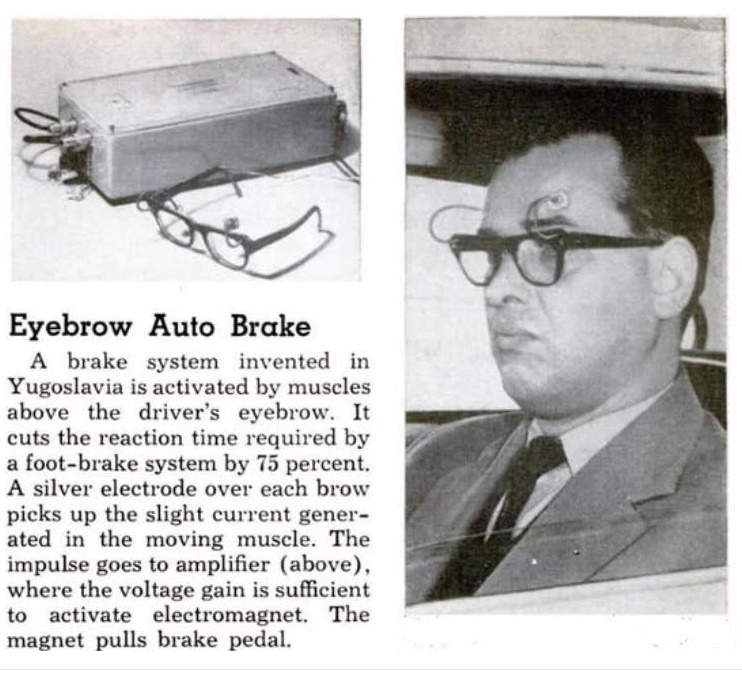
The sharp inventors of the Eyebrow Auto Brake went on to develop and offer the Yugo, which is quite popular now with vintage car enthusiasts......in Bratislava!
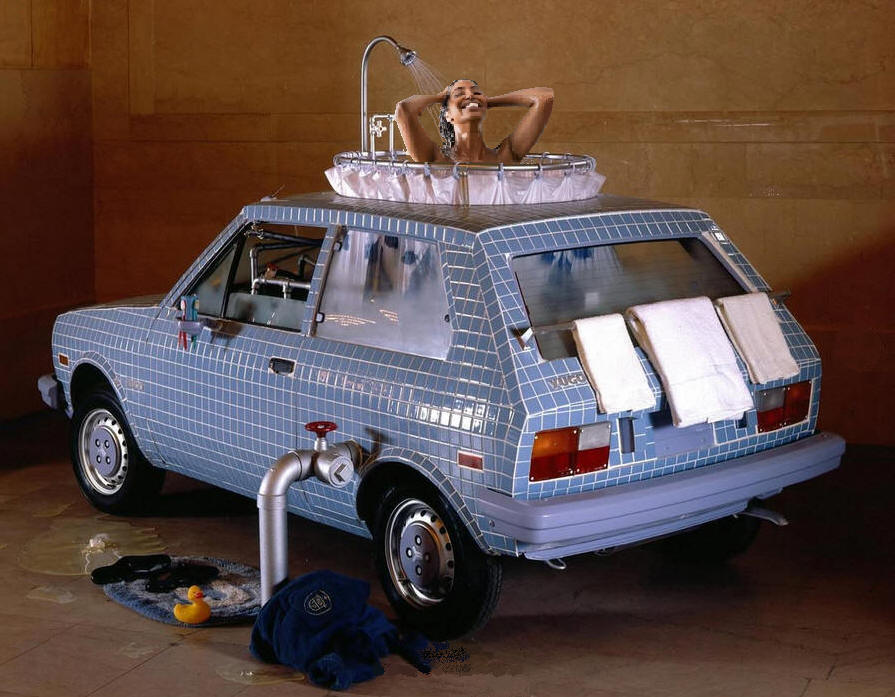
Yugo Model HCD, with extra-special features!
** Hot & Cold Dusche
Right Angle Drill, budget version:

---------------------------------
External material sources are attributed. Otherwise, this article is Copyright © 2024-2025. Ronald Kwas. The term Volvo, Yugo and names of other suppliers shown here are used for reference only. I have no affiliation with any of these companies other than to keep their products working for me, help other enthusiasts do the same, and also present my highly opinionated results of the use of their products here. The information presented comes from my own experience and carefully considered opinion (and fruitful little gray cells), and can be used (or not!), or ridiculed and laughed at, or worshipped, at the readers discretion. As with any recipe, your results may vary, and you are, and will always be, in charge of your own knuckles, and future!
You are welcome to use the information here in good health, and for your own non-commercial purposes, but if you reprint or otherwise republish this article, you must give credit to the author or link back to the SWEM site as the source. If you don’t, you’re just a lazy, scum sucking plagiarist, and the Boston Globe or maybe Harvard wants you! As always, if you can supply corrections, or additional objective information or experience, I will always consider it, and consider working it into the next revision of this article...along with likely the unique metaphor and probably (likely) wise-a** comment, if I can possibly work it in!.
